You can add as many services to your Zanda account as you need. These services are attached to your appointments and are generally used for invoicing.
In this article:
- Add a New Service
- How to Search the Services List for Existing Services
- How to change the order of services on services lists in Zanda and the Client Portal
- Edit an Existing Service
- Activate/Deactivate a Service
- Frequently Asked Questions
- Related Articles
How to Add a New Service
1. Go to User Menu > Account Settings > Billing > Services.
2. Click '+Add Service'
3. Complete the new service form.
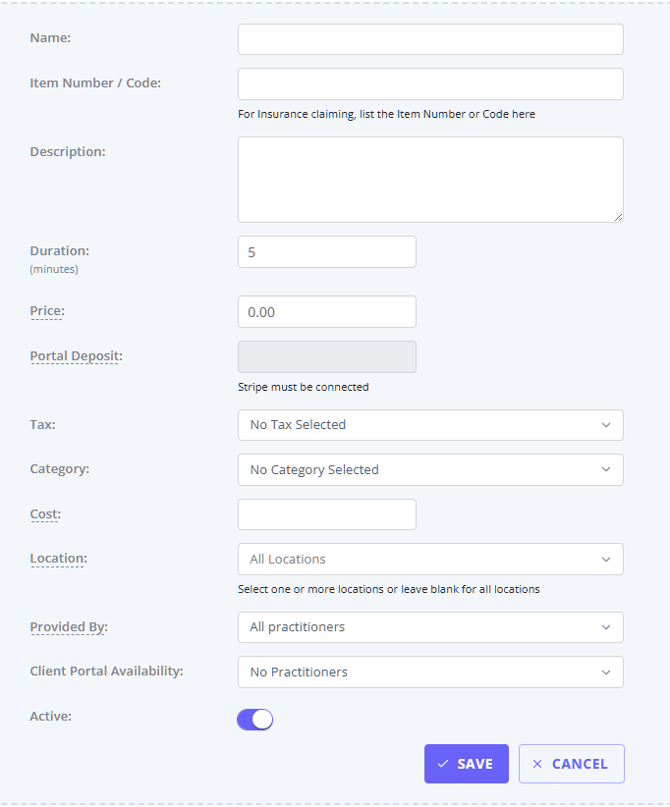
Here's what each field in the form above is for:
- Name: this is the title of the service that you will see in drop-down lists and on invoices.
- Item Number/Code: this is used to record a short piece of text to be used as a reference. This is an optional field. Please note that if submitting Medicare AU or DVA AU claims, this field should be used to record the relevant service code.
- Description: this is used to record a description of your service. This information will also appear
- on any invoices for that the service attached
- on your client portal if this service is made availble for online bookings, so you can use this to povide additional information about the srvice to your clients to help them make a decision at the time of booking
- Duration: used to record the duration of the service in minutes. This is also used to automatically set the length of new appointments booked with the service attached. Duration is always recorded in whole minutes. To charge by a unit other than time, such as distance, see the FAQ below on billing for travel or mileage.
- Price: use this field to record the price of your service, ensuring that any tax is included in the figure (such as GST). This will appear on invoices where this service is attached, and will also show on the client portal if you're taking payments from clients.
- Portal Deposit: if some amount is set up here, clients will be required to pay it when booking this service online via the Client Portal. You must connect to Stripe to be able to use this feature.
- Tax: use this field to record whether or not tax applies to the service. The tax percentage can be set in User Menu > Account Settings > Billing > Tax Rates
- Category: if you have multiple services, you can divide them into a category. To add a new category, go to User Menu > Account Settings > Billing > Saleable Categories. (Clients booking online through the Booking Portal will be able to filter by Category - therefore only relevant if you are going to allow your clients to book appointments via the booking portal)
- Cost: This is an optional field you can use to record your business's cost of providing a service. Cost is not visible to clients and other payees.
- Location: Service will only be available to select for appointments and invoices at the selected locations in your Zanda account and on your Client Portal.
- Provided By : records which practitioners regularly provide this service inside Zanda. Select All Practitioners , Some Practitioners , or No Practitioners. New services start as All Practitioners.
- If you choose Some Practitioners , a window opens after you save so you can switch the service on for each practitioner who provides it.
- This setting is a guide, not a restriction. It changes the order services appear in when your team books or invoices, and it never prevents anyone from selecting a service. See Provided By and Client Portal Availability below.
- Client Portal Availability: You can select practitioners who will be offering this service for online bookings on your client portal. Select No Practitioner, Some Practitioner, or All Practitioners.
- If you choose 'Some Practitioners' you will be able to select specific practitioners after you save the service template. Once you've click the 'Save' button, a modal will pop up. Iti will list all your practitioners and you will be able to enable a switch next to each practitioner who will be offering this service for online bookings on the Client Portal.
- This setting only changes what clients see when booking online. Inside a Zanda account your team can still assign any active service to any practitioner's appointment. Provided By is the separate setting that reflects who provides a service internally, and it also leaves every service selectable.
- Active: turn this switch off if you no longer wish to use this Service Template. This change will apply to future invoices only.
- Click 'Save' when ready.
All added services will be listed in User Menu > Account Settings > Billing > Services.
The Service List includes the following information:
- Service Name
- Item Number/Code
- Description
- Duration (minutes)
- Price $
- Tax
- Category
- Cost $ (ex. tax)
- Provided By (which practitioner regularly provides this service)
- Client Portal (visibility by calendars)
- Location (where made available)
- Active (Yes/No)
- Action (Edit/Activate)
☑️ Pro Tip:
To add a free service, such as a “Free Consultation”:
- go to User Menu > Account Settings > Billing > Services,
- then click '+Add Service'.
- Fill out the service form,
- set the price to $0.00,
- and select Tax Exempt.
Provided By and Client Portal Availability
These two settings sit next to each other, open the same window, and use the same All / Some / No Practitioners wording, so it is worth being clear on what each one does. They are independent: a service can be provided by every practitioner internally and offered to nobody on the Client Portal, or the reverse.
| Setting | What it records | Where you see the effect |
|---|---|---|
| Provided By | Which practitioners regularly provide the service inside Zanda | The order services appear in when your team books an appointment or adds an invoice item |
| Client Portal Availability | Which practitioners offer the service for online bookings | Which services clients can choose when booking through the Client Portal |
Neither setting stops your team selecting a service. Every active service stays available for every practitioner when you book or invoice inside Zanda.
Where you can set Provided By
- The service itself. Use the Provided By field when adding or editing a service, as described above.
- The Services list. The Provided By column shows a summary for each service, such as All Practitioners , No Practitioners , or 1 Practitioner. Click the value to change it.
- The service availability window. Open a service's availability window to see a Provides Service switch for each practitioner, alongside Available on Portal. Changes save as you make them.
- A practitioner's profile. The Available Services table has a Provides switch for each service. This is the quickest way to review one practitioner's whole service mix.
- Available Services grouped by service. Choose a service, then set Service is Provided and Available on Portal for each practitioner. This is the quickest way to review one service across the team.
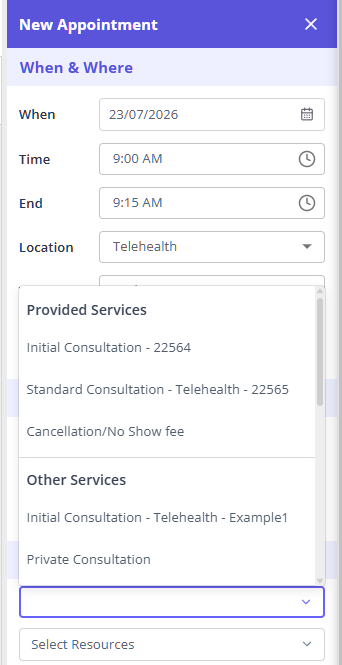
How this changes booking and invoicing
When you select a practitioner and then open the service list, services are grouped under two headings:
- Provided Services — the services that practitioner provides
- Other Services — everything else, still fully selectable
You will only see these headings when the practitioner has services in both groups. If a practitioner provides every service, or none, the list appears exactly as it always has, with no headings. Because new services start as All Practitioners , a practice that turns this on without changing anything will not see a difference until some services are narrowed to specific practitioners.
For the full guide — every place you can set Provided By, and how it changes booking and invoicing — see Marking Which Services Each Practitioner Provides.
How to Search the Services List for Existing Services
When you go to User Menu > Account Settings > Billing > Services you will see the full list of your active service templates.
If you need to quickly find a specific service or a group of services, use the provided filters.
1. The search bar with the prompt "Type here to filter the items below" specifically checks the text in these three columns in the Service List, so you can look up your services based on their
- Name (e.g., "Psychology Session")
- Item Number / Code (e.g., "80010")
- Description (e.g., "min duration 55 min...")
2. The second available filter allows you to search services by Locations.
3. You can also turn on the Show Inactive switch to see all inactive service templates.

How to change the order of services on services lists in Zanda and the Client Portal
The order of active services in User Menu > Account Settings > Billing > Services controls the order users see services in dropdown lists in Zanda and clients see when booking through the Client Portal.- Go to User Menu > Account Settings > Billing > Services.
- Find the active service you want to move.
- Drag the service into the preferred position in the Services list.
💡 Tip: The Client Portal Availability setting controls which practitioners can offer a service online. The Services list order controls where available services appear to clients during online booking.
How To Edit an Existing Service
You can change the details of the service(s) you’ve added to your Zanda account. Here’s how:
1. Using the main menu sidebar, navigate to User Menu > Account Settings > Billing > Services.
2. Click the gear icon on the far right side of the service whose details you’d like to change.
3. Click ' Edit'.
4. The service template form will open and you will be able to edit its fields as needed, then save again. When saving an existing service, Zanda asks whether you want to update all future-dated invoices. Choose Yes, update future invoices to copy the updated service details to active invoices dated after the current date, or decline the prompt to leave those invoice items unchanged.
Important: choosing Yes, update future invoices only updates billing details (name, code, description, tax, price, and cost) on future-dated invoices. It does not change the Duration or time block of appointments that are already booked in the calendar. Appointments keep the duration they were given when they were created, so if you change a service's Duration, existing bookings are not re-timed. To change the length of an appointment that's already booked, open it and adjust the Time in the When & Where section, or drag the top or bottom edge of the appointment on the calendar to resize it. Each existing appointment is updated individually — there is currently no bulk way to re-apply a new duration to appointments that are already booked.
Past and current invoice items keep the service details already saved on the invoice, including the Item Number/Code, service name, description, tax, price, and cost. To change one of those invoice records, edit the invoice item directly.
How To Deactivate/Activate a Service
You can deactivate a service in your Zanda account. Here’s how:- Using the left-hand menu on Zanda, navigate to User Menu > Account Settings > Billing > Services.
- Click the gear icon on the far right side of the service you’d like to disable and click ' Deactivate'.
- Click 'OK' to confirm.
Once a service is deactivated, it won’t show up in the Services List inside appointments, invoices and the Client Portal.
When necessary, you can reactivate a deactivated service. Here’s how:
- Toggle the 'Show Inactive' switch on the top-right corner of the Services page. This will show you a greyed-out list of deactivated services.
- Click on the gear icon on the far right corner of the service you’d like to re-enable.
- Click ' Activate'.

Frequently Asked Questions
❓ Will changing a service item code update invoice history?
Changing a service template updates future-dated invoices only when you choose Yes, update future invoices after saving the service. Past and current invoices keep the Item Number/Code and other service details already saved on each invoice item, so edit the invoice item directly if a historical invoice needs correction.
❓ Can I change a service price from a certain date?
For a planned price change, update the service price when you are ready for the new price to apply. Service prices take effect from the saved service details, rather than from a scheduled future start date.
When you save changes to an existing service, Zanda asks whether you want to update existing future-dated invoices with the new service details. Choose to apply the change if those future invoices should use the new price, or decline if already generated invoices should stay unchanged.
❓ I changed a service's duration — why didn't my already-booked appointments update?
A service's Duration sets the length of new appointments booked with that service attached (including appointments you create internally, not just online bookings). It does not change appointments that are already in the calendar. Choosing Yes, update future invoices when you save the service only updates billing on future-dated invoices — it does not move or resize the appointment time block. To change the length of an appointment that's already booked, open it and adjust the Time in the When & Where section, or drag the top/bottom edge of the appointment on the calendar. Each existing appointment must be updated individually; there's no bulk update for appointment durations.
❓Can I charge different fees for the same service, such as after-hours or clinician-specific fees?
Yes. Create a separate service template for each fee you need, because each service template has one default Price that is used when the service is added to invoices and shown on the Client Portal when payments are enabled.
For example, you might create separate services for a standard appointment, an after-hours appointment, or the same appointment delivered by a clinician with a different fee. Use clear service names so your team can select the right option when booking or invoicing.
If the different fee should only appear for specific online bookings, use Client Portal Availability to choose No Practitioners, Some Practitioners, or All Practitioners for that service. These settings control which practitioners can offer the service through the Client Portal. Internally, your team can still select any active service when creating appointments and invoices.
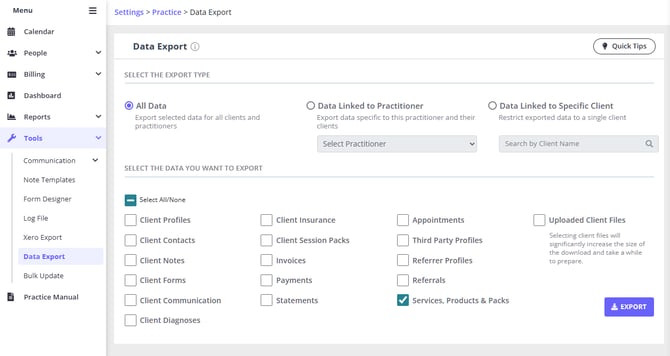
❓Can I export all services from Settings > Billing > Services into Excel?
Yes. To export a complete list of your configured services, use the Data Export tool rather than a financial report. Financial reports show services, products, or session packs that have been sold or invoiced in the date range you choose, while Data Export includes the configured services in your account.
- Go to Tools > Data Export.
- Select All Data.
- In the data selection grid, select Services, Products & Packs.
- Click Export.
- When the export is ready, download the ZIP file and open Services and Products.csv in Excel or a similar spreadsheet program.
The prepared export is available from the Download List for 72 hours, and the export history is shown there for 14 days.
❓How do I bill a service by quantity or units?
Create the service with the standard price for one billable unit, then update the Qty field on the invoice line when you invoice the appointment or sale. Zanda multiplies the service price by the quantity on the invoice item, so a service priced per 30-minute unit can be invoiced with Qty 2 when two units were provided.
Use session packs when you need to track a client's approved sessions, hours, or budget across appointments. Session packs help you monitor how much of an allowance has been used, while the invoice line Qty controls the quantity charged on a specific invoice.
❓ Can I bill for travel or mileage, such as a charge per kilometer?
Yes, using a product priced per kilometer rather than a service. Duration is always recorded in whole minutes and sets the length of new appointments booked with that service, so distance is billed through a product instead.
To charge for distance traveled, set up a product priced for one kilometer and add it to the invoice:
- Go to User Menu > Account Settings > Billing > Products and click +Add Product. See Adding and Editing Products for the full product setup steps.
- Give it a clear name such as Travel - per KM, and set Price to your rate for a single kilometer.
- Set Tax, Category, and Location as needed, turn Active on, then click Save.
- When you invoice the appointment or sale, add the product as a line item and set Qty to the number of kilometers traveled. Zanda multiplies the price by the quantity, so 12 kilometers at $1.20 is billed as $14.40. Qty accepts decimals, so part-kilometers such as 12.5 are fine.
Products have no duration, so a per-kilometer product adds the travel charge to the invoice without changing the length of the appointment.
If you also charge for the time spent traveling, create a separate service (for example Travel Time) with the Duration and Price you charge for it, and add it to the appointment or invoice alongside the per-kilometer product.
The same approach works for any charge measured in something other than time.
- If you bill travel under an NDIS plan, see Managing NDIS Billing (AU-only).
Related Articles
- Setting Up Available Services and Times on Client Portal - Choose which services each practitioner can offer for online bookings.
- How Can I Limit Services and Products By Locations? - Limit services to selected locations for appointments, invoices, and Client Portal bookings.
- Exporting Your Data - Learn how to use Data Export and download exported CSV files.
- Setting Up Session Pack Templates - Create session pack templates for tracking sessions, hours, or approved budgets.