%20-%20120%20x%2044.svg)
You can send appointment reminders to your clients to notify them of their upcoming appointments. This practice is essential for increasing attendance rates and minimizing the likelihood of no-shows. Reminders can be delivered through SMS, email, or a combination of both methods. Furthermore, you have the flexibility to send these reminders either manually or automatically, depending on your needs.
Important
A dedicated Toll-Free Number (TFN) is required to send/receive SMS messages in the USA, Canada, Puerto Rico, Bahamas, Jamaica, Costa Rica, and Barbados. For more details, please click here.
In this article, we’ll show you how to do all this. Let’s get started.
In this article:
- Setting Up Automatic Appointment Reminders
- Setting Up Manual Appointment Reminders
- Automatically Sending New Appointment Creation Confirmation Notifications
- Automatically Notifying Clients When an Appointment Is Cancelled
- Setting Up Appointment Reminders For Specific Clients
- Adding or Editing Appointment Reminder Templates
- Setting Up Automatic Appointment Confirmation/Cancellation
- Keywords for Confirming and Cancelling
- How Zanda Matches a Cancellation Reply to an Appointment
- Enabling/Disabling Appointment Reminders for Specific Appointments
- Seeing Which Appointments Have Reminders Turned Off
- Frequently Asked Questions
- Related Articles
Setting Up Automatic Appointment Reminders
Automatic appointment reminders are enabled by default when you create a trial account. However, if they are disabled or if you wish to modify any settings related to automatic appointment reminders, follow these simple steps:
- Go to User Menu > Account Settings > Communication > Reminders.
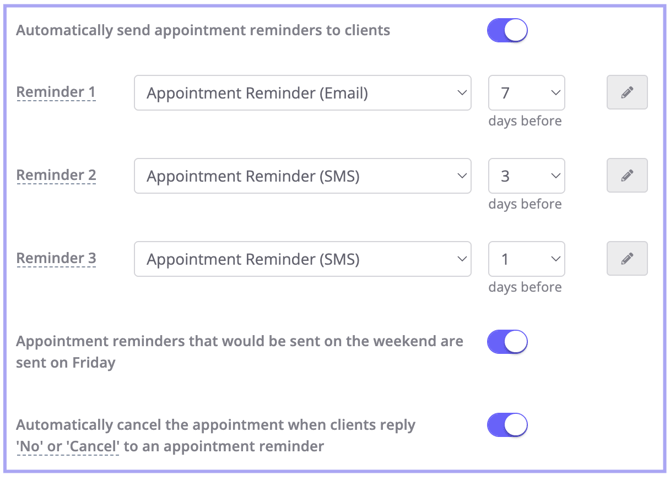
- Turn on the switch next to the label Automatically send Appointment Reminders to Clients on the top-left corner of your screen.
- Select a template and the number of days before the appointment for each reminder you want to send.
- Click Save Changes at the bottom of the page.
- When Zanda asks Would you like to update all your existing clients to use these reminders?, choose the option that matches what you want to happen:
- Select Yes to apply the account reminder settings to existing clients and their future appointments.
- Select No to keep existing client reminder preferences as they are. New clients and clients without individual reminder settings can still use the account-level settings.
You can send a maximum of three reminders to your clients for each appointment.
Which appointments receive automatic reminders?
Automatic reminders go to appointments that have a client attached. That covers individual client appointments, and it covers each client you add to a group appointment, since every participant is booked in with their own client record. The group booking itself has no client attached, so the reminders go to the participants rather than to the group.
Personal appointments, such as staff meetings, breaks, and admin time, sit outside the automatic reminder schedule. There is no client on a personal appointment to send a reminder to, so no reminder is generated for one even when automatic reminders are switched on for the account.
Automatic reminders are sent to appointments with a Pending or Confirmed status only. Appointments in any other status (Arrived, Completed, Rescheduled, Cancelled, Late Cancellation, or No Show) will not receive automatic reminders.
What happens when an appointment is rescheduled?
When your team moves an appointment to a new date and time in the future, Zanda clears its record of the reminder already sent, so an automatic reminder can be sent again for the new time if reminders are enabled and the appointment meets the reminder timing rules. A Client Portal reschedule also sets the appointment status back to Pending.
If your team changes an appointment status to Rescheduled, automatic reminders are not created for that appointment while it has that status.
Automations are separate from reminders. For what happens to pre-appointment, post-appointment, recall, and new client automations when an appointment is moved, see Setting Up a Pre-Appointment Automation.
To enable a reminder, you need to do two things:
- Select a template for that reminder.
- Select how many days before the appointment you would like the reminder to be sent.
You can schedule reminders to be sent between 7 and 1 days before the appointment start date. The reminder setup uses days before options only; there is no separate time-of-day field to edit on the appointment reminder settings page.
Zanda automatically sends these reminders every day from 9 am to 10 am and from 4 pm to 5 pm, based on the local time zone you set in Business Info.
If you turn on Appointment reminders that would be sent on the weekend are sent on Friday, reminders that would normally be sent on Saturday or Sunday are sent on Friday instead. This setting affects the day the reminder is sent; the reminder still uses the standard local delivery windows above.
It is not possible to send an automatic reminder on the same day that the appointment starts.
You can use the Notify Now button on an appointment panel to send an appointment reminder manually on the same day, if needed.
If you wish to turn off a reminder, simply click Choose Template when selecting a template from the drop-down menu.
Once you’ve added the settings you want, simply click Save Changes at the bottom of the page to activate Automatic Appointment Reminders.
💡 Turning reminders on for an existing account. If you are enabling automatic reminders after clients and appointments already exist, use the update all existing clients prompt that appears when you save the Reminders page.
💡 Appointments due tomorrow. Automatic reminders are generated during the daily reminder windows above. If you do not want a specific upcoming appointment to receive an automatic reminder, open that appointment and turn its Reminder switch off before the reminder is generated.
Sending reminders for some services or locations only
You can limit reminders to a subset of your appointments, and the order you set it up in matters. Turn the account-level reminder off first, then use a pre-appointment automation to send the message to the appointments you do want:
- Go to User Menu > Account Settings > Communication > Reminders, turn off Automatically send appointment reminders to clients , and click Save Changes. This clears the reminder setting on every client profile and on every future appointment in the account, so the standard automatic reminder stops for all of them.
- Go to User Menu > Account Settings > Communication > Automations and create a pre-appointment automation for the appointments you do want to message. Conditions include service, location, practitioner, appointment status, appointment flag, client status, client classification, client type, and telehealth status, and the message is sent only to appointments that match every condition you set. See the full setup guide here.
💡 Automations add a message, they do not hold one back. A pre-appointment automation runs on its own and has no effect on the standard automatic reminder. If you leave the account-level reminder switched on and add an automation, appointments that match the conditions receive both messages, and appointments that do not match still receive the standard reminder.
To leave a single appointment or a single client out instead, use the Reminder switch on that appointment or the client's own reminder settings, described in Setting Up Appointment Reminders For Specific Clients below. Those are the narrower controls, and neither needs the account-level reminder turned off.
Setting Up Manual Appointment Reminders
In addition to the automatic appointment reminders, you can also manually send appointment reminders whenever you want.
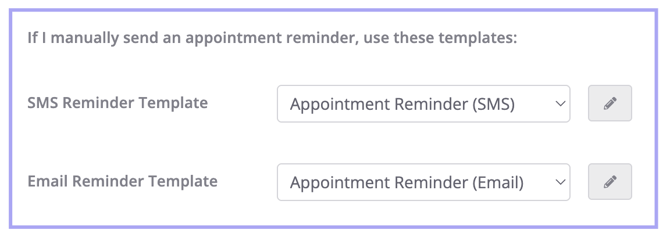
By default, SMS and Email reminder templates will already be selected, but you can change these if desired.
Here’s how:
1. Go to User Menu > Account Settings > Communication > Reminders.
2. On the right side settings, under 'If I manually send an appointment reminder, use these templates' section, you can choose templates for SMS and email reminders using the drop-down menu.
3. After you set the templates, click on the Save Changes button at the bottom of the page.
Once this is done, you can manually send an appointment reminder in two ways, as described in the following article Sending Appointment Reminders Manually.
Automatically Sending New Appointment Creation Confirmation Notifications
Zanda allows you to automatically send a message to clients as soon as a new appointment is created in their schedule. This feature is helpful when you want clients to receive an immediate appointment confirmation for bookings added by your team, separate from your regular reminder messages, so they know their appointment has been successfully scheduled.
This setting is available under: User Menu > Account Settings > Communication > Reminders
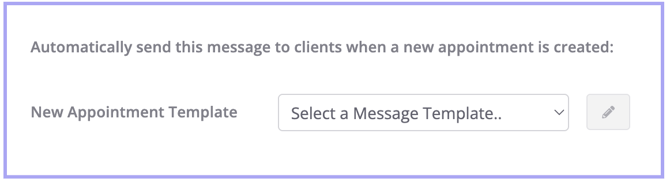
Look for the section titled “Automatically send this message to clients when a new appointment is created.”
Enable this by selecting a New Appointment Template. Once a template is chosen:
- The message is automatically sent every time a new appointment is created by your team.
- This message is sent for every appointment your team creates—whether the client is brand new or a returning client. It is triggered by the appointment being booked, not by whether the client is new, so there is no option on the New Appointment Template to limit it to first-time clients.
- When your Client Portal is enabled, separate Client Portal notification settings can also send booking messages for appointments clients create online. If your Client Portal is disabled, use the New Appointment Template setting on the Reminders page for staff-created appointments.
-
You can choose any existing SMS or email template for this purpose. Note: You can only select one template from the dropdown. It is not currently possible to send both an SMS and an Email confirmation simultaneously for a new appointment.
-
Clients receive instant confirmation, helping reduce uncertainty and follow-up questions.
Use this option if you want clients to be notified right away when a new appointment is added by your team.
Which appointments this applies to: The confirmation is sent for any appointment that has a client attached. This covers individual client appointments as well as group appointments — when you add a client to a group appointment, that client receives the message. It is not sent for personal appointments (for example staff meetings, breaks, or admin time) or for any appointment that has no client linked to it, since in those cases there is no client to notify.
Important Notes:
-
If you also use the client portal notifications, make sure you select a different new appointment booked notification template for client in User Menu > Account Settings > Client Portal > Notifications to avoid sending duplicate messages to your clients.
- Updating the details of an existing appointment does not trigger the appointment creation confirmation notification, as the system does not treat it as a new appointment. In such cases, mark the existing appointment as “Rescheduled” and create a new appointment at the updated date/time for the “New Appointment Template” to be triggered.
Can I stop the new appointment confirmation for just one client?
To control exactly who receives a confirmation, leave the New Appointment Template dropdown on Select a Message Template… and send confirmations by hand to the clients who want them. See Sending Appointment Reminders Manually.
That manual approach is the way to do this because the New Appointment Template is an account setting: it applies to every client who has an appointment booked, and clearing it stops the message for all of them. The same is true of bookings clients make themselves. A Client Portal booking sends both the Client Portal New Appointment Creation notification and the New Appointment Template , and both are set once for the whole account, so clearing one still leaves the other sending.
Several per-client settings might help in specific situations. Here is what each one actually does:
- Automatically Send Appointment Reminders (client profile > Profile > Appointment Reminders). Controls the scheduled reminders sent in the days before an appointment. It has no effect on the confirmation sent when the appointment is created.
- Receives SMS set to Unsubscribed (client profile > Admin). Stops all SMS to that client, so an SMS New Appointment Template stops reaching them. This one works for SMS only; email has no equivalent.
- Client can book appointments on the portal turned off (client profile > Admin). Stops that client booking online, so they receive no portal booking confirmation. Appointments your team books for them still send it.
- Receives Reminders on a client contact. Leaves that contact out of the message. The client themselves is always included.
- Shared Profiles. Each member receives the confirmation only when Appointment Reminders - Send reminders about all appointments for the shared profile is switched on for that member, so you can leave an individual member out.
Automatically Notifying Clients When an Appointment Is Cancelled
You can automatically notify a client when their appointment is cancelled by a user, so you no longer need to send a cancellation message by hand each time. Once this is set up, Zanda sends your chosen template to the client whenever a team member changes a future-dated appointment to Cancelled or Late Cancellation.
How this differs from the SMS reply setting below: the Setting Up Automatic Appointment Confirmation/Cancellation section further down controls the incoming direction — a client replying to an SMS reminder to cancel their own appointment. This setting is the outgoing direction — notifying the client after a team member cancels the appointment in Zanda. They are separate settings and can be used independently.
Setting it up:
- Go to User Menu > Account Settings > Communication > Reminders.
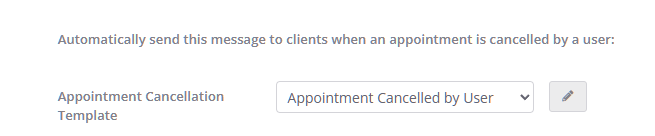
- Under the Appointment Cancellation Template dropdown, select the email or SMS template you want to send.
- Click Save Changes. Cancellation notifications will now be sent automatically.
The dropdown lists all your active email and SMS templates. To turn automatic cancellation notifications off, leave the dropdown set to Select a Message Template….
When notifications are sent:
A cancellation notification is triggered whenever a team member cancels a future-dated appointment, however they do it:
- Right-clicking an appointment and selecting Cancelled or Late Cancellation.
- Updating the status from the appointment panel.
- Changing a participant's status in a group appointment.
- Opening a participant's full appointment details in a group appointment and updating the status.
Who receives the notification:
- Individual clients — the notification is sent to every contact who has Receives Reminders enabled.
- Shared Profiles — the notification is sent to each member of the Shared Profile who has Receives Reminders enabled.
Good to know:
- Only future-dated appointments trigger the notification; past appointments are not affected.
- The notification is sent only when a team member cancels the appointment. It is not sent when a client cancels by replying to an SMS reminder (that is the incoming direction described in Setting Up Automatic Appointment Confirmation/Cancellation below).
Setting Up Appointment Reminders For Specific Clients
You also have the option to create personalized appointment reminders tailored specifically for individual clients. Individual client reminder settingso verride the account-level reminder templates and timing set in User Menu > Account Settings > Communication > Reminders, and are used any time you create a new appointment for this specific client. They cover the automatic appointment reminders only. The New Appointment Template and the Appointment Cancellation Template on that same page stay account-wide and apply to every client.
Here’s how you set up individual client reminders:
-
Use the Quick Search bar located at the top of the Zanda dashboard to find the specific client for whom you wish to configure appointment reminders.
-
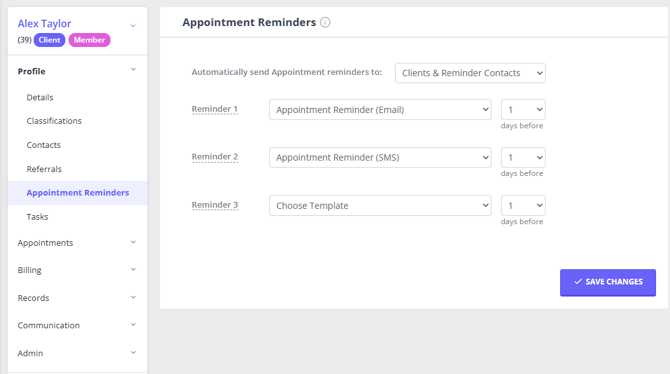
Once you’re in the profile of your client, go to Profile > Appointment Reminders.
-
Configure the reminders for the client. You can send a maximum of three reminders to your clients for each appointment.
-
To enable a reminder, you need to do the following:
- Select who received the reminders: the client and their contact or just the contact
- Select a template for that reminder.
-
Select how many days before the appointment you would like the reminder to be sent.
-
You can schedule reminders to be sent between 7 and 1 days before the appointment start date.
-
It is not possible to send an automatic reminder on the same day that the appointment starts.
- You can use the Notify Now button on an appointment panel to send an appointment reminder manually on the same day, if needed.
-
- If you wish to turn off a reminder, simply click on Choose Template when selecting a template from the drop-down menu.
- Once you’ve added the settings you want, simply click on Save Changes at the bottom of the page to activate Automatic Appointment Reminders for this client.
The Profile > Appointment Reminders page has an Automatically send Appointment reminders to: dropdown at the top, with three options:
- Clients & Reminder Contacts: the default. Reminders go to the client and to any contacts on their profile who are flagged to receive reminders.
- Reminder Contacts Only: reminders go only to the client's reminder contacts; the client themselves receives nothing. This is useful for a client who cannot receive their own reminders directly, such as a child whose reminders should go to a parent or guardian, without hiding the client's own contact details the way removing their email used to.
- Off: no reminder is sent to the client or their contacts at all.
This choice applies consistently whether the reminder is sent automatically on schedule or sent manually, for example from the Notify Now button or the appointment context menu. See Sending Appointment Reminders Manually.
💡 Selected Reminder Contacts Only but no contacts are flagged to receive reminders? Zanda still saves the setting, but shows a warning that no reminders will be sent, since there is nobody to send them to. Add a contact on the client's profile and turn on their reminder-receiving option: see Adding Client Contacts Manually.
This dropdown does not apply to shared profiles. Shared profiles keep their own separate per-member reminder controls, described under Automatically Sending New Appointment Creation Confirmation Notifications above.
Adding or Editing Appointment Reminder Templates
Your account comes pre-configured with both an email and an SMS template for appointment reminders.
If you wish to modify an existing template or create a new one from scratch, follow these simple steps:
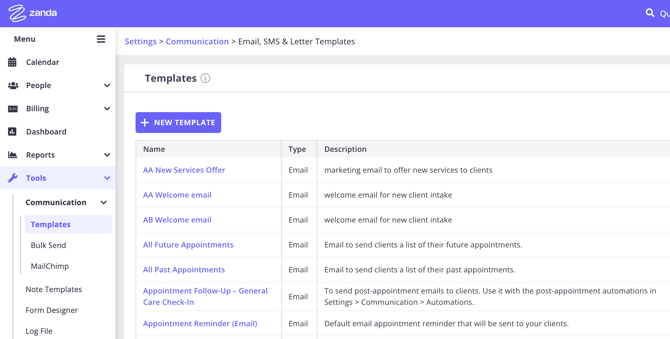
1. Go to Tools > Communication > Templates.
2. Here, you will see the '+ New Template' button at the top of the page. Click on it to create a new template.
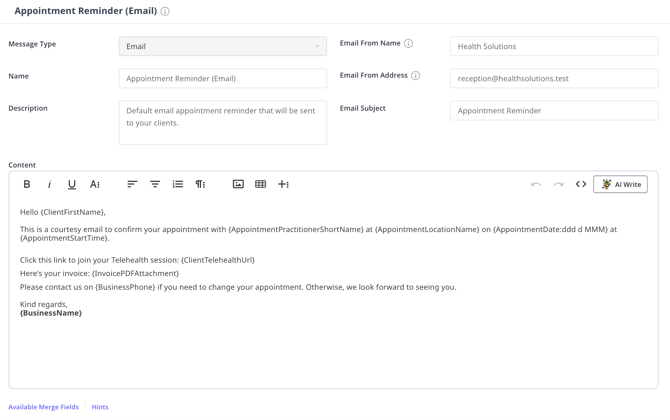
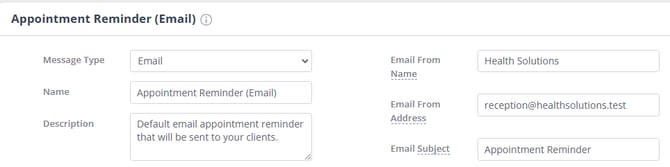
3. Start by choosing the 'Message Type' i.e. is this new template an email, SMS or a letter?
4. Then, name the template and describe its purpose in the description box.
5. If you’ve chosen the 'Message Type' as 'Email', enter your business name and email address
6. Type in the email subject i.e. title of the email.
7. Once done, scroll down until you see the content text editor. Here, type in your template and click Save.
If you want to attach an invoice pdf file to your reminder emails, you can use the {InvoicePDFAttachment} merge field in your communication email templates to generate and add an invoice pdf attachment to the reminder email.
To let clients add the appointment to their own calendar, use the {AppointmentAddToCalendar} merge field, which attaches a calendar file the client opens to save the appointment. A reminder email carries a single attachment, so {AppointmentAddToCalendar} and {InvoicePDFAttachment} in the same template will not both arrive: on an appointment that has an invoice, the invoice PDF takes the attachment and the calendar file is left off, with no warning. On an appointment with no invoice there is no PDF to send, so the calendar file is attached instead. Use a separate template for each. See Available Merge Fields for Communication Templates for the full description of both fields.
Use the Available Merge Fields and Hints buttons at the bottom of the text editor to see ways to personalize your template.
8. After saving your template, go back to Tools > Communication > Templates. Here, you’ll find your newly created template under the Template List.
9. If you’d like to edit a template, just click on its name.
10. It is possible to deactivate the template to remove it from the list of active templates. Click the Actions gear icon next to the template in the list of all templates and select Deactivate.
Screenshot 1
Screenshot 2
Screenshot 3
Setting Up Automatic Appointment Confirmation/Cancelation
Use automatic and manual SMS appointment reminders to automatically confirm or cancel client appointments.
💡Automatic and manual EMAIL reminders CANNOT be used to automatically confirm or cancel appointments.
- In User Menu > Account Settings > Communication > Reminders, enable automatic and manual reminders and set up an SMS reminder. When clients reply to this reminder using confirmation key words, the system will automatically reset their appointment status to 'Confirmed'
- On the same settings page, enable the 'Automatically cancel the appointment when clients reply 'No' or 'Cancel' to an appointment reminder' switch. When clients reply to an SMS reminder using cancellation keywords, the system will automatically reset their appointment status to 'Cancelled'
User Pro Tips:
- You can view client responses by accessing the Messaging Panel on the Zanda dashboard. Whenever you receive a new reply from a client, a notification bubble will appear, indicating the number of unread messages awaiting your attention.
- When clients respond to your SMS reminder with a cancellation request, and if cancellation is enabled in your account settings, any existing invoices for those appointments will not be automatically deleted. This approach ensures that you can manage cases where a cancellation fee may apply or when it is necessary to keep a record of appointments that have already been invoiced or paid prior to the cancellation.
- Here is the list of keywords Zanda looks for in a client’s reply after sending them an SMS appointment reminder.
Key Words to Confirm and Cancel:
Confirmed:
- Y
- Yes
- Yep
- Confirm
- Conf
- No Worries
Cancelled:
- N
- No
- Sorry
- CXL
- Cancel
- Cancelled
Important
- Please be aware that CANCEL is a keyword for automatic unsubscribing according to regulatory USA/Canada requirements. If your account is based in the USA or Canada, please recommend your clients reply with N or No when they wish to cancel their appointment.
- When clients reply to SMS reminder to cancel, it must be N on it's own, otherwise if it's part of a string (such as N. ) it won't be detected and the appointment status will not be updated to canceled
- Some clients who use iOS phones may react to a reminder SMS with emoji (e.g., by liking, hearting, or giving a thumbs up). In this case, a copy of the original message will be sent back to your Zanda account letting you know that a client reacted to your message. If the reminder message contains a confirmation or cancellation keyword, this automatic response can unintentionally trigger a cancellation.
- A later reply can override an earlier one—there's no time limit. Each SMS reply is checked against the appointment's current status when it arrives, not against how long ago the client last replied. If a reply carrying the opposite keyword comes in after a client has already confirmed or cancelled—even hours later—the appointment's status will change again. If you see a status change you weren't expecting, open the client's Communication Activity on their profile and check every reply logged against that reminder, not just the most recent one, to see what came in and when.
- If this keeps happening with the same client, you can turn off Automatically cancel the appointment when clients reply 'No' or 'Cancel' to an appointment reminder (above) and cancel that client's appointments manually instead. Their replies will still be logged in Communication Activity, but won't change the appointment status automatically.
-
Limitation with Multiple Appointments on the Same Day: If a client has multiple appointments booked on the same day and receives multiple SMS reminders at the same time from the same number, they will generally only be able to reply once. This single reply will typically confirm only one of the appointments. This is a known limitation with a feature request available for voting.
How Zanda Matches a Cancellation Reply to an Appointment
- A cancellation keyword doesn't need to be the whole message. If a client's SMS reply contains one of the cancellation keywords above (for example 'Cancel' or 'Sorry') anywhere within a longer, more detailed message, Zanda treats it the same as a bare 'Cancel' reply, and the appointment status still updates automatically. This is different from the N keyword, which must be sent on its own (see above).
- Which appointment gets cancelled depends on how the SMS was sent. If the cancellation keyword is sent as a direct reply to a specific appointment reminder, that appointment is the one cancelled. If instead your client sends a brand-new SMS to your practice's number, rather than replying to a particular reminder thread, Zanda has no way to tell which appointment the message is about from its text. In that case, it cancels whichever appointment reminder was most recently sent to that client, which may not be the appointment they intended.To make sure the right appointment is affected, ask clients to reply directly to the specific reminder SMS for the appointment they want to change, rather than sending a new, separate text. If a cancellation affects the wrong appointment, check the client's Communication Activity on their profile to see exactly which message triggered it.
Enabling/Disabling Appointment Reminders For Specific Appointments
You can enable/disable appointment reminders for individual appointments in Zanda.
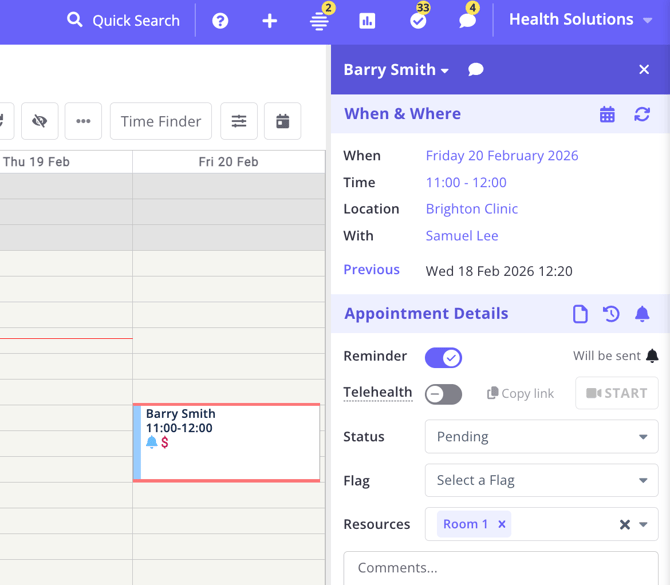
1. To do that, go to your appointments calendar on the Zanda dashboard. Here, click on the appointment whose reminder you want to enable/disable.
2. Once the appointment settings panel opens up on the right side of your screen, click on the 'Reminder will be sent' or the 'Reminder will not be sent' switch to toggle appointment reminders on or off for that appointment.
The appointment panel also shows the current reminder status:
- Sent means an automatic reminder has already been sent for the appointment.
- Will be sent means an automatic reminder is scheduled for the appointment.
- Will not be sent means the appointment is not set to receive an automatic reminder.
- Was not sent means the appointment has passed and no automatic reminder was sent.
On the calendar, hover over the bell icon to see the reminder status tooltip. Use the tooltip or the appointment panel status as the source of truth rather than color alone.
Note 💡If there were any future-dated appointments in the inactive practitioner's calendar, their automatic reminders will not go out after the practitioner is made inactive.
Seeing Which Appointments Have Reminders Turned Off
To review this across your clients, export your appointments and filter the file in Excel or a similar spreadsheet program. This lives in Tools > Data Export rather than in Reports, so there is no report to look for.
- Go to Tools > Data Export.
- Select the export type you need: All Data , Data Linked to Practitioner , or Data Linked to Specific Client.
- Select Appointments , then click Export.
- When the export is ready, download it from the Download List at the bottom of the page and open Client Appointments.csv.
- Filter or sort the ScheduleReminder column. False means the appointment is set to Reminder will not be sent ; True means it is set to Reminder will be sent.
Each row also carries the appointment's start and end time, the client's name and client number, and the practitioner's calendar, so you can see which client and which appointment the setting belongs to.
A few things to keep in mind:
- The appointments export is not limited to a date range. It covers past and upcoming appointments, so filter on the Start column when you only want to check appointments still to come.
- Appointments brought into Zanda from a connected external calendar are created with the reminder switched off, so they appear as False as well.
- You need the Allow Data Export permission to see Tools > Data Export. See Exporting Your Data.
To check the reminder setting on the client profile instead (Profile > Appointment Reminders), select Clients in the same export and review the Schedule Reminders column in Clients.csv. These are two separate settings: Schedule Reminders in Clients.csv is the client's profile setting, and ScheduleReminder in Client Appointments.csv is the switch on one individual appointment.
Frequently Asked Questions
❓ Why did a client receive an appointment message when automatic reminders are turned off?
Start by checking the message type and where it was configured. Standard automatic appointment reminders are controlled in User Menu > Account Settings > Communication > Reminders, but other appointment-related messages can also be sent from Zanda.
Check these areas:
- Account-level reminder settings: Go to User Menu > Account Settings > Communication > Reminders. If you change the account-level reminder settings and Zanda asks whether to update existing clients, choose Yes when you want the change to apply to current client profiles.
- Client-specific reminder settings: Open the client profile and go to Profile > Appointment Reminders. Client reminder settings can be configured separately from your account-level reminder settings.
- Individual appointment reminders: Open the appointment panel and check whether the appointment is set to Reminder will be sent or Reminder will not be sent.
- Pre-appointment automations: Go to User Menu > Account Settings > Communication > Automations and review any Pre-appointment automations. These can send targeted SMS or email messages before appointments based on conditions such as service, location, practitioner, appointment status, appointment flag, client status, client type, client classification, or telehealth status. A pre-appointment automation sends its message independently of your reminder settings, so a client can receive one even when the standard automatic reminder is switched off, and can receive both when it is switched on.
- New appointment confirmation messages: In User Menu > Account Settings > Communication > Reminders, check whether a New Appointment Template is selected in the section for messages sent when a new appointment is created. This is separate from scheduled reminder messages.
- Appointment cancellation notifications: In User Menu > Account Settings > Communication > Reminders, check whether an Appointment Cancellation Template is selected. When one is set, a message is sent automatically whenever a team member changes a future-dated appointment to Cancelled or Late Cancellation.
- Manual reminders: If a team member used Notify Now or the appointment context menu, the reminder was sent manually rather than by the automatic reminder schedule.
If the message came from a pre-appointment automation, review the automation conditions and template. Pre-appointment SMS actions can be useful for targeted reminders, but they do not include the same reminder-specific features as standard appointment reminders, such as automated reply handling to update appointment statuses.
❓ Can I automatically notify clients when I cancel their appointment?
Yes. Select an Appointment Cancellation Template under User Menu > Account Settings > Communication > Reminders. Once set, your chosen email or SMS template is sent automatically whenever a team member changes a future-dated appointment to Cancelled or Late Cancellation. See Automatically Notifying Clients When an Appointment Is Cancelled above for who receives it and when. This is the outgoing notification for team-initiated cancellations, and is separate from clients cancelling by SMS reply (covered by Setting Up Automatic Appointment Confirmation/Cancellation).
❓Can I use a different appointment reminder for each service?
You can set the reminder templates and the reminder timing used across your practice, override both on an individual client profile, include location details in the message with merge fields, and turn reminders on or off from the appointment itself. The automatic reminder takes its template from the account settings or from the client profile, so it does not vary with the service booked on the appointment.
To send a message that is specific to one service, set up a pre-appointment automation with a Service condition. If you want that automation to replace the standard reminder rather than arrive alongside it, follow the order set out in Setting Up Automatic Appointment Reminders above.
One naming point, because it sends people looking in the wrong place: in Zanda, Appointment Type means Client, Personal, or Group. The field that records what an appointment is for is the Service, and Service is the condition the automations use.
❓ Can the 'From' email address on appointment reminders be different for each practitioner?
No. The Email From Name and Email From Address shown on a reminder email come from the email template used for that reminder—they are set on each template under Tools > Communication > Templates and are not linked to the practitioner the appointment is booked with. There is no setting that automatically uses each practitioner's own email address as the sender, and merge fields cannot be used in the Email From Name or Email From Address fields.
If you would like reminders to reflect each client's practitioner, the closest options are:
- Create a separate reminder email template for each practitioner under Tools > Communication > Templates, each with that practitioner's Email From Name and Email From Address, and select the matching template on each client's profile under Profile > Appointment Reminders. Keep in mind this is a per-client setting—the reminder uses the template chosen on the client's profile, and it does not change automatically if the client books with a different practitioner.
- Show practitioner details inside the reminder message using merge fields such as {AppointmentPractitionerFullName} and {AppointmentPractitionerEmail} in the template content. See Available Merge Fields for Communication Templates.
❓ Can I send the new-appointment or welcome message to new clients only?
Not through the New Appointment Template—that message goes out every time your team creates an appointment, for new and returning clients alike. To send a welcome or intake message to first-time clients only, use a New Client automation instead (User Menu > Account Settings > Communication > Automations) with the 'Only clients created by users' condition. It runs once when the client profile is created, so returning clients being re-booked won't receive it. See Setting Up New Client Automations.
❓ Do ACMA or other SMS rules change how appointment reminders work in Zanda?
Zanda gives you controls to manage SMS appointment reminders, but your practice is responsible for confirming how ACMA or other SMS rules apply to your communications. For appointment reminders, you can choose the SMS reminder template, manage whether a client receives SMS messages, and use unsubscribe handling when a client opts out.
Before sending SMS appointment reminders, confirm the client has agreed to receive SMS communication from your practice. If a client asks to stop receiving SMS messages, go to their profile and set Receives SMS to Unsubscribed. Clients can also opt out by replying stop, unsubscribe, or opt out to an SMS, and Zanda will mark them as unsubscribed from SMS communication.
❓ Can clients add the appointment to their own calendar from a reminder?
Yes. Add the {AppointmentAddToCalendar} merge field to your email reminder template. It puts the appointment date and time into the message as text and attaches a calendar file named event.ics, which the client opens to save the appointment into whichever calendar application they use. It works on group appointments too, because each attendee's place in the group is a separate appointment, so every attendee gets a calendar file for their own booking.
Two things to know before you use it. It needs a selected appointment, so it prints nothing on a template sent without one. And a reminder email carries a single attachment, so if the same template also contains {InvoicePDFAttachment}, an appointment that has an invoice sends the invoice PDF and leaves the calendar file off, with nothing to flag it. An appointment with no invoice has no PDF to send, so the calendar file goes out instead. Keep the two merge fields in separate templates. See Available Merge Fields for Communication Templates.
❓ Why is the practitioner's name missing from my reminder email?
Check the Shortened Name field on that practitioner. The {AppointmentPractitionerShortName} merge field used by the Email Reminder Template that comes with a new account reads Shortened Name and nothing else, so when that field is empty the merge field prints nothing and the sentence closes up around the gap. It does not fall back to Practitioner Name or Real Name. Shortened Name is optional and starts empty on every practitioner Zanda creates, so a reminder can look broken while the template, the appointment, and the reminder settings are all correct.
Go to User Menu > Account Settings > Team > Practitioners , click the practitioner's name, fill in Shortened Name on the Details page, and click Save. The same applies to the other practitioner merge fields, each of which reads one optional field with no fallback. See Available Merge Fields for Communication Templates.
❓ What does Pending mean for an appointment reminder?
If the appointment pop-up says Appointment Reminder scheduled to be sent, the automatic reminder has not been marked as sent yet. After it is sent, the pop-up changes to show Appointment Reminder sent on: followed by the sent date and time.
In the client's Communication Activity, a reminder message can show Pending while the SMS or email is queued and prepared to send. For email reminders, Pending can also mean delivery is delayed and Zanda will retry automatically.
If the status stays pending longer than expected, check the client's mobile number or email address and their reminder settings. You can also review the Communication Activity or Email Activity report for the latest message status.
Related Articles
- Sending Appointment Reminders Manually - Send SMS or email appointment reminders from the appointment calendar or appointment panel.
- Setting Up New Client Automations - Send a one-time welcome or intake message to first-time clients only, scoped to clients your team creates.
- Setting Up a Pre-Appointment Automation - Create targeted appointment messages based on appointment conditions.
- Creating and Managing Communication Templates - Create and edit the SMS and email templates used for reminders and automations.
- Available Merge Fields for Communication Templates - Reference for every merge field, including Add To Calendar and what each field shows when its source is empty.
- Managing SMS Communication Preferences - Learn how to subscribe or unsubscribe clients, contacts, referrers, and third parties from SMS communication.
- Using SMS Feature Efficiently - Review SMS communication options, replies, forwarding, and SMS charges.
- SMS Reminders FAQs - Troubleshoot common SMS reminder questions.
- Exporting Your Data - Export your account's appointments, clients and other records as CSV files.