%20-%20120%20x%2044.svg)
Creating and managing shared profiles in Zanda allows you to streamline appointments, invoicing, and record-keeping for couples or other shared treatments involving multiple clients. This feature is designed to simplify the process by consolidating important details into a single profile, making it easier to manage joint appointments, track payments, and keep comprehensive session notes for shared treatments. Whether you are coordinating care for families, couples, or groups, shared profiles offer a seamless way to handle all aspects of client management efficiently.
In this article:
- Creating a New Shared Profile
- Overview of a Shared Profile
- Creating Appointments for Shared Profiles
- Invoicing the Shared Profile
- Using Advanced Search for Shared Profiles
- Using Client Portal as a Shared Profile Member
- Collecting extra information for shared profile bookings
- Related Articles
Creating a New Shared Profile
1. To create a shared profile*,
-
click 'People' on the main menu and select Add
- Alternatively, you can click the ➕ icon on the top panel and select Client
2. select 'Shared' as the profile type you are going to create.
3. Enter the profile name and click 'Next'.
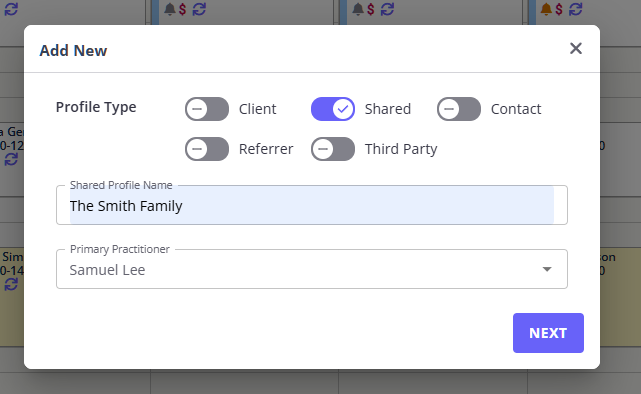
4. A new shared profile will be created. You will be able to
- Add Client Status to the shared profile;
- Add Client Type to the shared profile;
- You can use the client status and client type fields to locate shared profiles efficiently by applying filters in the Advanced Search feature.
- Add members of this shared profile. Click 'Add Member':
5. You will be able to select existing client profiles to add them as members of this shared profile. Click the 'Select and existing client' and search for a profile you'd like to add.
6. The first profile you add will automatically become a primary member of the shared profile. You will be able to disable this setting and enable it on another profile, if necessary.
💡 When sending a bulk communication message to Shared profiles, only the primary member of each shared profile will be included in the recipient list and will receive the bulk message.
7. On the member settings, you will also be able to
-
allow each profile member to make portal appointments on behalf of the shared profile,
-
and receive appointment reminders for the shared profile. Appointment reminders will pick up the time zone set in the each member profile when sending out reminders.
To enable reminders for an existing shared profile member, open Shared Profile > Profile > Details and find the member in the Shared Profile Members table. Click the gear icon at the end of the member's row, select Edit Member, turn on Appointment Reminders, and click Save. Repeat this for each member who should receive reminders. The Receives Reminders column in the members table shows which members have this setting enabled.
💡 Tip: You do not need to add shared profile members as contacts of each other to send them reminders for appointments booked under the shared profile. Contact reminder settings are for reminders about an individual client profile's appointments.
8. To add more members, go the shared profile Details page and click 'Add Member' again.
9. Beside selecting an existing client profile to add as a shared profile member, you will be able to create new client profiles for the members, when necessary.
*Note:
- A new shared profile can only be created via the People > Add menu or the ➕ icon.
- When new profiles are created on the new appointment panel, on the Waitlist or when clients register via the client portal, they will be created as client profiles.
- An existing individual client profile cannot be converted into a shared profile after it is created. To bring that client into a shared arrangement, create a new shared profile (steps 1-3 above) and add the existing client as a member (step 5).
1. The Profile section:
- The shared profile Details page includes a list of added profile members, their contact details and their member status and permissions.
- When Zanda users make changes on the Details page of a Shared profile, Zanda automatically creates a corresponding entry in Tools > Log File user activity logs. This provides an auditable record of user activity and helps support teams and administrators track any updates to the Details page if troubleshooting or verification is required.
- You can set a Client Status and Client Type for a shared profile. The client status and client type fields can be used to locate shared profiles efficiently by applying filters in the Advanced Search feature.
- Use the 'Additional Comments' text box to enter additional information about the profile.
- The Classifications page allows you to allocate one or more of your account client classifications, which will be very helpful with account reports.
- The Contacts page allows you to add contact profiles to the shared profile.
- Use the Referrals page to add referrals to the shared profile.
- The Appointments Reminders page lets you configure reminder settings specific to this shared profile, which will override the general automatic reminder settings of your account.
- The Tasks page is where you can manually set tasks for this shared profile and assign them to specific users if necessary.
2. The Appointments section is where you will find:
- Appointments list - List of all appointments created for this shared profile
- Statistics - Summary information about their appointment history
- Telehealth - contains this profile's unique Telehealth meetings link and instructions for practitioners how to start a Telehealth call.
3. The Billing section will hold all the billing details and records of invoicing and payments for the shared profile. The primary member will be allocated as a payee for the shared profile by default. It is possible to select other payees when necessary.
- Billing Setup - configure invoicing options & defaults.
- Invoices - this is a list of all the invoices that have been issued to this shared profile
- Payments - this is a list of all the payments that have been received from this shared profile
- Statements - This is a list of all the shared profile statements
- Superbills (US-only) - This is a list of the shared profile superbills issued for insurance reimbursement
- Authorizations (US-only) - list of authorizations for this shared profile
- Session Packs - review and edit all the current and expired session packs for this shared profile.
4. The Records folder records confidential information of the shared profile, including their session notes, file uploads, correspondence and diagnoses.
❕Note:
- Online forms cannot be generated in shared profiles
- Online forms can only be sent to each shared profile member individually from their client profiles.
- Session notes - list of all clinical and admin notes created for this shared account. The notes created in the shared profile will be generated as records of the whole shared profile, not per a specific profile member.
- Files - List of files uploaded for this shared profile.
- Correspondence - all the communication that has been saved to the permanent correspondence record
- Diagnoses - list of diagnoses for this shared profile.
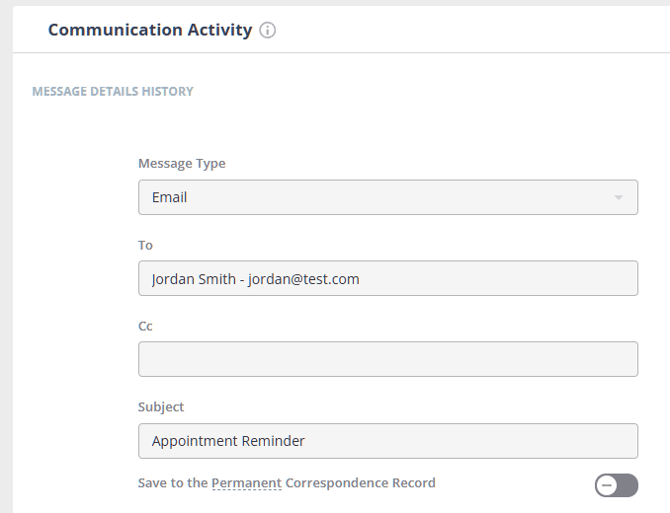
5. Use the Communication feature of the shared profile to send SMS, emails and generate letters. The primary member of the shared profile will be a default contact, and you will be able to CC communication to the other profile members. This is separate from appointment reminders: reminders are sent to members who have Appointment Reminders enabled in their member settings.
- Activity - all sent and received communication within the last twelve months. If you would like to store communication for longer than this period please select the 'Save to the Permanent Correspondence Record' option when adding or editing communication.
- New SMS - create a custom SMS to send to one or multiple members of the shared profile.
- New Email - create an email to send to one or multiple members of the shared profile, and associated contacts, referrers and third parties. Use Bizzy AI: Write to help you draft emails to shared profile members.
- New Letter - create a new Letter to email to a selected recipient (client, referrer, etc.) Let BizzyAI: Write to help you draft the professional letters in your tone and style in seconds.
6. The Admin section will help you manage this profile settings and store non-clinical records.
- Manage page allows you to record the personal data consent, archive and delete the shared profile. You can also use this page for additional appointment management: set appointment alert notes and warnings, a default appointment flag and block new appointments creation.
- The Admin Notes section of a shared profile also allows to add and store admin notes.
- The Admin Files - this is a list of files uploaded for this client
1. To create a new appointment for the shared profile,
- Select the calendar time block to bring up the appointment panel.
- Search for the shared profile in the Client search field.
- Add other appointment details and service, if needed.
- Save the appointment.
2. The client type appointment will be generated for the shared profile.
Pro Tip: Want to check which profile member received an appointment reminder and confirmed an appointment?
- Open the shared profile > Communication > Activity
- Find the record of the sent email or SMS reminder message
- Open the message and check the recipient details in the To field, it will be an email address/mobile number of the member profile.
1. Invoices generated for the shared profile will be billed to their primary member by default.
- You can set a different default payee in the Bill To field on the Shared Profile Details > Billing > Billing Setup page.
- You will also be able to select a different payee on a specific invoice when needed in the Payable By dropdown.
2. When a shared profile invoice is printed.
- The Invoice To field will include the payee information,
- while the Provided To section will list all members of the shared profile.
3. Paying a shared profile invoice with a member's saved credit card.
When you take a Stripe card payment on a shared profile's appointment or invoice, Zanda charges the card saved against the payee on that invoice.
- If a member already has a card saved in their own client profile (Client Profile > Billing > Billing Setup > Saved Card Details) and that member is the payee, the payment form offers their saved card, masked and pre-filled, so you can confirm the amount and take the payment without re-entering the details.
- Book the appointment under the shared profile as usual and set the member as the payee. There is no need to book it under that member's individual profile.
- Set the payee using Bill To for every invoice, or Payable By for a single one, as described in point 1 above.
- Always check the name shown at the top of the card payment form. It names the payee whose saved card Zanda will charge, and Zanda records the payment in that payee's profile.
❕Note :
- The Saved Card Details section of any profile lists only the cards saved against that profile. A card saved in a member's individual profile will not appear in the shared profile's Saved Card Details, even though it can still be charged whenever that member is the payee.
- A shared profile can hold a saved card of its own, but while Bill To is set to a member, the payment form offers that member's card.
- Add a member's card from their individual client profile: send them an online form containing the Credit Card (Stripe) linked profile field, or enter the card manually in their Billing > Billing Setup. Zanda sends online forms from each member's own profile rather than from the shared profile.
1. The People > Shared menu allows you to search for shared profiles and get an overview of all shared profiles in your account.
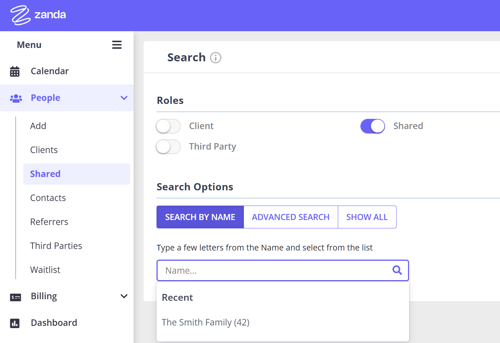
2. The Advanced Search feature will help you search for one or a list of shared profiles, filtered by shared profile members details, shared profiles appointments information and classifications.
Using Client Portal as a Shared Profile Member
You can allow a member of a shared profile to book appointments for the shared profile on your client portal. This setting can be found in a Shared Profile > Details > Member settings.
More than one member of the shared profile can be given permission to book appointments for the shared profile on your client portal.
1. The shared profile member will be logging in with their individual client profile details.
2. When they book a new appointment they will be able to select who this appointment is for, themselves as an individual client, or a shared profile they are a member of
3. A member of the shared profile will be able to see invoices billed to them (if they are a self-paying individual client, and a default payee member of a shared profile)
4. A member of the shared profile will be able to see a list of future-dated appointments scheduled for them as a individual client and for their shared profile(s)
Collecting extra information for shared profile bookings
For couples counseling or other shared treatments, use the shared profile for the booking and use online forms for structured intake information.
When an approved shared profile member books through the Client Portal, they can choose whether the appointment is for their own individual profile or for a shared profile they belong to. If they need to add booking-specific context, they can use the Add Notes option on the booking confirmation step. These notes are saved to the appointment notes, so your team can review them from the appointment.
For custom questions, intake details, or information you want saved back to a profile field, send an online form to the relevant shared profile member. Custom Profile Fields can be used in online forms as linked profile fields, and submitted answers can update the member's individual profile. For shared profile work, this is the recommended way to collect structured information before or after a Client Portal booking.
Related Articles
- Add and Manage Custom Profile Fields - Create profile-specific fields that can also be used in online forms.
- Sending Online Forms to Clients - Add online form links to Client Portal registration or booking notifications.
- Setting Up Online Bookings on Client Portal - Configure the Client Portal settings clients use to book online.