%20-%20120%20x%2044.svg)
This article will go through the list of available Communication Merge fields, telling you what each one does. Merge fields are added to email, SMS and letter templates from the Tools > Communication > Templates menu.
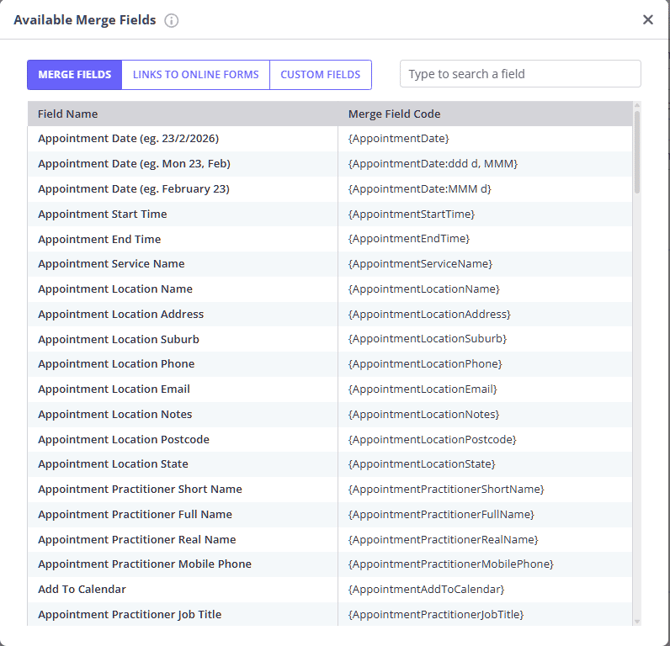
This article just goes through each individual merge field and what it means. To learn how to add a Merge field to your templates, please review our article: Creating Communication Templates.
In this article:
- Appointment-specific Merge Fields
- Information Merge Fields
- Billing Merge Fields
- Recipient Details
- Client Details
- System Merge Fields
- Client's Preferred Practitioner Merge Fields
- Referrer Merge Fields
- Next, Previous, Last, All Appointment Merge Fields
- User Merge Fields
- Links to Online Forms
Appointment-specific Merge fields
The following fields are based on the selected appointment. They will cause " (!)" to appear prior to the template name, and it means that an appointment needs to be selected prior to using this template. If no appointment is selected, a blank space will appear.
- Appointment Date: {AppointmentDate};
{AppointmentDate:ddd d, MMM}; {AppointmentDate:MMM d}
This field will be replaced with the date of the appointment. There are different options depending on how you want the date to be formatted. The fields above will display as 17/05/2022, Mon 17, May, May 17 respectively. - Appointment Start Time : {AppointmentStartTime}
The start time of the appointment. The time appears in the short-time format for your account's country and language, so whether it reads as 1:00 PM or 13:00 follows that regional format. Unlike {AppointmentDate}, this field has no per-field format options, so you can't change how it displays by adding a format variant to the merge field. By default the time shows in your business time zone. If you have enabled Merge Client's Time Zone in Client Communications (User Menu > Account Settings > Communication > Communication Options) and the client has a Time Zone set on their profile (Client Profile > Details), the time automatically converts to the client's local time and the time zone abbreviation is added, for example "Your appointment is at 11:00 AM AEDT." This conversion and label happen even when the client's time zone is the same as your business time zone, so setting a client's time zone is a reliable way to always show a zone label. If the setting is turned off, or the client has no time zone set, the time shows in your business time zone with no time zone label, and you can add a fixed label to your template yourself, for example "Your appointment is at {AppointmentStartTime} AEDT." See Sending Appointment Reminders in your Clients' Time Zone for setup. - Appointment End Time : {AppointmentEndTime}
The end time of the appointment. It follows the same format and time zone behavior as {AppointmentStartTime}: the time appears in the short-time format for your account's country and language, and when Merge Client's Time Zone in Client Communications is enabled and the client has a Time Zone set on their profile, the time converts to the client's local time with the time zone abbreviation added. - Appointment Service Name: {AppointmentServiceName}
The name of the Service attached to the appointment. - Appointment Location Name: {AppointmentLocationName}
The name of the Location of the appointment. You can learn more about Location details and settings within our article Setting Up and Using Multiple Locations. - Appointment Location Address: {AppointmentLocationAddress}
The address of the Location as specified within the Location settings. - Appointment Location Suburb: {AppointmentLocationSuburb}
The Suburb of the Location as specified within the Location settings. - Appointment Location Phone: {AppointmentLocationPhone}
The phone number of the Location as specified within the Location settings. The different locations of your practice may possibly have different phone numbers. - Appointment Location Email: {AppointmentLocationEmail}
The email address of the Location as specified within the Location settings. - Appointment Location Notes: {AppointmentLocationNotes}
The Notes for the Location as specified within the Location settings. Eg you may add extra notes on how to access Parking. We recommend you don't use this field for SMS templates, as it may cause the message to be too long. - Appointment Location Postcode: {AppointmentLocationPostcode}
The postcode of the Location as specified within the Location settings. - Appointment Practitioner Short Name : {AppointmentPractitionerShortName}
This is the Shortened Name field on the practitioner the appointment is booked with, set in User Menu > Account Settings > Team > Practitioners. It reads that one field and nothing else, so if Shortened Name is empty the merge field prints nothing, and it does not fall back to Practitioner Name or Real Name. Shortened Name is optional and starts empty on every practitioner Zanda creates, both the ones set up with a new account and any you add later. The Email Reminder Template that comes with a new account uses this merge field, so an empty Shortened Name is a common reason a practitioner name is missing from an otherwise correct reminder. See Adding and Editing Practitioners for where to fill it in. - Appointment Practitioner Full Name: {AppointmentPractitionerFullName}
This is the "Practitioner Name" from the calendar the appointment has been booked with. - Appointment Practitioner Real Name: {AppointmentPractitionerRealName}
This is the "Real Name" from the calendar the appointment has been booked with. - Appointment Practitioner Mobile Phone: {AppointmentPractitionerMobilePhone}
This is the Mobile Number from the calendar the appointment has been booked with. -
Appointment Practitioner Email : {AppointmentPractitionerEmail}
This is the Email Address from the calendar the appointment has been booked with.
Please note: Like all appointment-specific fields, {AppointmentPractitionerEmail} only fills in when the template is used with a selected appointment. On a template that isn't tied to an appointment—for example a client contract—it will appear blank even when the practitioner's email is saved. To show the practitioner's email on those templates, use the client's preferred practitioner field {ClientPrimaryPractitionerEmail} instead, which displays the client's preferred practitioner's email regardless of whether an appointment is selected.
- Add To Calendar: {AppointmentAddToCalendar} This places the appointment date and time into the message as text, and attaches a calendar file named event.ics to the email. The recipient opens that attachment to trigger the add-to-calendar process for whichever calendar application they use on their device. The entry it creates is titled with the practitioner's name and carries the appointment's location, start time, and end time. The field needs a selected appointment: on a template used without one, it prints nothing and no calendar file is attached. It also works on group appointments, because each attendee's place in the group is a separate appointment, so a reminder sent to a group gives every attendee a calendar file for their own booking.
- Appointment Practitioner Job Title: {AppointmentPractitionerJobTitle}
This is the job title of the practitioner with whom the appointment is booked. - Group Appointment Name: {GroupAppointmentName}
This only applies if the appointment is a group appointment (or "class"), and is the name of the group appointment.
Please note: It is not possible to assign different reminder templates to separate locations. Instead, there are two ways to manage reminders across appointment types (in person and telehealth):
-
Single Template Approach – Include all appointment-related merge fields in one reminder template (for example, including the
ClientTelehealthUrlfield). You can add a note instructing clients to use the Telehealth link only if their appointment is Telehealth. -
Automation Approach – Exclude the Telehealth URL from your main reminder template and use a Pre-Appointment automation to send the Telehealth link only to clients who are booked at your Telehealth location.
❗ Please note that when the ClientTelehealthUrl merge field is included in any communication template, it will automatically populate with the unique Telehealth link for each client, regardless of appointment location.
Frequently Asked Questions
❓ An appointment is attached to my message, so why did a merge field still come out blank?
Because the field it reads is empty on the record. An appointment merge field does two separate things: it checks that an appointment is selected, and then it reads one named field from that appointment. If the appointment is selected but the field it reads has no value saved, the merge field prints nothing and the words around it close up, so the message reads as though it was never there. That looks the same as a broken merge field or a missing appointment, and it is neither.
The practitioner fields are where this shows up most often, because Practitioner Name is the only one Zanda requires. Shortened Name , Real Name , Email , Mobile Number , and Job Title are all optional, and each merge field reads exactly one of them with nothing to fall back on:
- {AppointmentPractitionerShortName} reads Shortened Name and only that.
- {AppointmentPractitionerFullName} reads Practitioner Name and only that.
- {AppointmentPractitionerRealName} reads Real Name and only that.
- {AppointmentPractitionerEmail} reads Email and only that.
- {AppointmentPractitionerMobilePhone} reads Mobile Number and only that.
- {AppointmentPractitionerJobTitle} reads Job Title and only that.
To fix it, go to User Menu > Account Settings > Team > Practitioners , click the practitioner's name, fill in the field on the Details page, and click Save. Messages sent from then on will include it. Messages already sent are not changed.
The same shape applies to some of the other appointment fields:
- {AppointmentServiceName} reads the invoice attached to the appointment and lists the items on it, so it prints nothing on an appointment with no invoice, and shows every item when the invoice has more than one.
- {GroupAppointmentName} prints nothing unless the appointment is a group appointment with a name saved on it.
- {AppointmentLocationAddress} , {AppointmentLocationSuburb} , {AppointmentLocationPostcode} , {AppointmentLocationState} , and {AppointmentLocationNotes} print nothing when there is no appointment, when the appointment has no Location on it, or when that detail is not filled in on the Location.
Appointment Location Name , Appointment Location Phone , and Appointment Location Email are the exception. When there is no appointment, or the appointment has no Location on it, they fall back to your business name, business phone, and business email instead of printing nothing, so a message built without a selected appointment can still look complete.
❓ How do I tell a blank merge field from a misspelled one?
Look at the message that arrived, not the template. A merge field Zanda recognizes is always taken out of the text, whether or not it had a value to put there, so a recognized field with nothing to show leaves a gap. A merge field Zanda does not recognize, such as a typo like {AppointmentPractionerShortName}, is left in the message exactly as typed, braces and all.
So braces in the delivered message point to a spelling problem in the template, and a gap points to an empty field on the record. Capitalization is not part of the match, so {appointmentpractitionershortname} still works; it is the letters and the braces that have to be right. To avoid typos altogether, add merge fields from Available Merge Fields at the bottom of the template editor rather than typing them by hand.
Information Merge Fields
These fields are used for general information about your practice, adding attached documents and invoice pay links, and also provide a way to be able to include today's date.
- Your Business Name: {BusinessName}
This is the name of your business as entered within User Menu > Account Settings > Practice > Business Info. You can learn more about the Business settings within our Updating your Business Information article. - Your Business Phone Number: {BusinessPhone}
This is the phone number for your business as set up within Business Info. - Todays Date: {TodaysDate}; {TodaysDate:dd MMMM yyyy}
Today's date, in two different formats. The first will display as dd/mm/yyyy, eg 31/03/2022. The second will display as 31 March 2022. - Attached Document Name (manual messages only): {SystemDocumentName1} -
This merge field is intended for use in templates that involve sending Zanda files as attachments, such as Notes and Forms, Invoices and Statements, when they are sent manually. It will automatically be replaced with the name of the attached file. However, if there is no file linked to the email, the merge field will not function and will simply result in a blank space.
⚠️Automation not supported: {SystemDocumentName1} only works in manual messages.
- It cannot be used in Automations. To attach or link billing documents automatically,use {InvoicePDFAttachment} or {InvoicePDFLink} from the Billing Merge Fields section below.
Billing Merge Fields
💡 Use these fields for automations.
The merge fields in this section work in both
manual emails and SMS and Automations.
Note: {SystemDocumentName1} from the Information section above does not work in Automations — use {InvoicePDFAttachment} or {InvoicePDFLink} and other billing merge fields instead.
- Invoice Pay Link: {InvoicePayLink}
This applies when emailing or sening via SMS an invoice only. It will be replaced with a link which your client can use to pay your invoice online or downloading an invoice. This only works for an online payment if you have Stripe set up on your account. You can learn more within our Emailing Link to Pay Invoice Online article. - Invoice PDF Link: {InvoicePDFLink} - This merge field can be used with invoicing automation and other communication templates. It will generate a URL via which a recipient will be able to access and download an invoice as a pdf file. If your Zanda account is linked with your Stripe account, they will also be able to pay their invoices directly through the Invoice PDF Link.
- Statement PDF Link: {StatementPDFLink} - This merge field can be used to automatically send monthly statements to payees. It will generate a URL via which a recipient will be able to access and download a statements as a pdf file.
- Superbill PDF Link: {SuperbillPDFLink} - This merge field can be used to automatically send monthly superbills to payees. It will generate a URL via which a recipient will be able to access and download a superbill as a pdf file.
- Statement PDF Attachment (Email Only): {StatementPDFAttachment} - This merge field can be used to automatically send monthly statements to payees. It will generate a pdf file and add it as an attachment to the sent email.
- Superbill PDF Attachment (Email Only): {SuperbillPDFAttachment} - This merge field can be used to automatically send monthly superbills to payees. It will generate a pdf file and add it as an attachment to the sent email.
- Invoice PDF Attachment (Email Only): {InvoicePDFAttachment} - This merge field can be used to generate an invoice pdf attachment to an email, sent via automations, automatic and manual reminders and manual invoice emails.
- Client's Account Balance: {ClientAccountBalance} - This merge field displays the client's current account balance.
- Invoice Date: {InvoiceDate} - This merge field displays the date of the invoice.
- Invoice Due Date: {InvoiceDueDate} - This merge field displays the due date of the invoice.
- Invoice Number: {InvoiceNumber} - This merge field displays the invoice number.
- Invoice Amount: {InvoiceAmount} - This merge field displays the total amount of the invoice.
- Invoice Balance: {InvoiceBalance} - This merge field displays the outstanding balance of the invoice.
Please note: For privacy reasons, the links generated for the {InvoicePDFLink}, {StatementPDFLink}, and {SuperbillPDFLink} merge fields will expire after 7 days. If payees need to access those documents for a longer period of time, please either ask them to download the PDF within that 7 day window, or consider using the {InvoicePDFAttachment}, {StatementPDFAttachment}, or {SuperbillPDFAttachment} merge fields to attach the PDF directly to an email instead where possible.
Frequently Asked Questions
❓ Can I add a third party name to invoice and statement emails?
Use the recipient merge fields when an invoice or statement email needs to address the payee. For manual invoice emails, Zanda uses the invoice payee as the message recipient, so fields such as {RecipientFullName}, {RecipientPreferredName}, and {RecipientBusinessName} can populate from the client, contact, or third party receiving the email. If you create or edit an invoice email template in Tools > Communication > Templates, also select it under User Menu > Account Settings > Billing > Invoices > Invoice Email Template so it is used for invoice emails.
❓ Can I show the appointment practitioner's email in invoice or receipt email templates?
Use {AppointmentPractitionerEmail} in appointment reminder templates, where Zanda has a selected appointment to reference. Standard invoice and receipt email templates are selected from User Menu > Account Settings > Billing > Invoices. Because they may be sent from an invoice or receipt without an appointment selected, appointment-specific merge fields such as {AppointmentPractitionerEmail} may not populate there. Create or edit the email template in Tools > Communication > Templates, then select it as the Invoice Email Template or Receipt Email Template under Billing > Invoices.
❓ Can I use {SystemDocumentName1} in my invoicing automation or paid invoice automation?
No — {SystemDocumentName1} only works in manual emails and SMS. In automations, use
{InvoicePDFAttachment} to attach the PDF directly, or {InvoicePDFLink} to include a
download link. These fields work in automations and will automatically reflect the correct
document (Invoice or Receipt) based on the invoice's payment status.
❓ Will the PDF attachment show "Receipt" instead of "Invoice" once the invoice is paid?
Yes, when you use {InvoicePDFAttachment} or {InvoicePDFLink} in an automation triggered
by a paid invoice, the attached or linked PDF will reflect the document's current state
(i.e., it will say "Receipt" if the invoice is fully paid). {SystemDocumentName1} cannot
be used for this — it is manual-email and SMS only.
❓ Is there a merge field for a practitioner's Medicare provider number or ABN?
No. Communication, SMS, and letter templates do not include a merge field for a practitioner's Medicare provider number, or for a practitioner or practice ABN. The only provider-number merge field available is {ReferrerProviderNumber}, which displays the referrer's provider number—not a practitioner's.
If you need a practitioner's Medicare provider number or ABN to appear in a template, type it directly into the template as fixed text. Keep in mind that a template is shared rather than tied to one practitioner, and a practitioner's Medicare provider number is recorded separately for each insurer in their profile—so a value you type in will stay the same on every send regardless of who the template is used by. For that reason, static text works best in templates only ever used by a single practitioner.
Want these as merge fields? Let us know via Help menu > Submit an Idea so we can weigh it up for a future update.
Recipient Details
When you are sending an email or SMS you can change who the message will be going to. The message may be going to a Contact, a Referrer, or an invoice payee such as a third party. The fields below get their information from the Recipient's profile rather than the client's. You can learn more about adding Contacts from our Adding Client Contacts article, and Referrers from our Adding/Editing Referrers and Referrals article.
- Recipient's Salutation: {RecipientSalutation}
This merge field displays the salutation of the recipient. - Recipient's Full Name: {RecipientFullName}
This merge field displays the full name of the recipient. - Recipient's First Name: {RecipientFirstName}
This merge field displays the first name of the recipient. - Recipient's Last Name: {RecipientLastName}
This merge field displays the last name of the recipient. - Recipient's Preferred Name: {RecipientPreferredName}
This merge field displays the preferred name of the recipient as set in their profile. If no preferred name is available, this merge field will display the first name instead. - Recipient's Number : {RecipientNumber}
This merge field displays the recipient's profile number—the system-generated number shown in brackets after their name on their profile. For a phone number, use {RecipientMobilePhone} instead. - Recipient's Mobile Phone: {RecipientMobilePhone}
This merge field displays the recipient's mobile number. - Recipient's Email Address: {RecipientEmailAddress}
This merge field displays the email address of the recipient. - Recipient's Address: {RecipientAddress}
This merge field displays the physical (home) address of the recipient. - Recipient's State: {RecipientState}
This merge field displays the state of the recipient. - Recipient's Suburb: {RecipientSuburb}
This merge field displays the suburb of the recipient. - Recipient's Postcode: {RecipientPostcode}
This merge field displays the postcode of the recipient. - Recipient's Business Name: {RecipientBusinessName}
This merge field displays the business name of the recipient.
Client Details
These merge fields will help you populate the details of the clients with whom you're directly communicating in your business. The fields get their information directly from the client profile in which you're creating your communication template, or when you select the related appointment booked with the client.
- Client's Full Name: {ClientFullName}
This merge field displays the full name of the client. - Client's First Name: {ClientFirstName}
This merge field displays the first name of the client. - Client's Last Name: {ClientLastName}
This merge field displays the last name of the client. - Client's Preferred Name:{ClientPreferredName}
This merge field shows the client's preferred name as specified in their profile. If no preferred name is available, it will display the client's first name instead. To switch your existing templates over to the preferred name, see Using a Client's Preferred Name in Your Messages. - Client's Gender: {ClientGender}
This merge field displays the client's gender (this is a feature that is not available to new Zanda accounts that were created after the 12th of July 2023, but is kept available to older accounts where Gender filed was originally provided). - Client's Sex: {ClientSex}
This merge field displays the client's Sex as it is recorded in their Client Profile - Client's Gender Identity: {ClientGenderIdentity}
This merge field displays the client's Gender Identity as it is recorded in their Client Profile - Client's Salutation: {ClientSalutation}
This merge field displays the salutation of the client. - Client's Number : {ClientNumber}
This merge field displays the client's Client Profile Number (also called the Client ID#)—the system-generated number shown in brackets after their name on the client profile. Use it when you want a message to identify a client by number rather than by name. For the client's home phone number, use {ClientHomePhone}. - Client's Date of Birth: {ClientDOB}
This merge field displays the client's date of birth. -
Client's Age : {ClientAge}This merge field displays the client's age.
- Client's Mobile Phone: {ClientMobilePhone}
This merge field displays the client's mobile number. - Client's Home Phone: {ClientHomePhone}
This merge field displays the client's home number. - Client's Work Phone: {ClientWorkPhone}
This merge field displays the client's work number. - Client's Fax: {ClientFax}
This merge field displays the client's fax number. - Client's Email Address: {ClientEmailAddress}
This merge field displays the email address of the client. - Client's Address: {ClientAddress}
This merge field displays the physical (home) address of the client - Client's State: {ClientState}
This merge field displays the email address of the recipient. - Client's Suburb: {ClientSuburb}
This merge field displays the suburb of the client. - Client's Postcode: {ClientPostcode}
This merge field displays the postcode of the client. - Client's Medicare Number: {ClientMedicareNumber}
This merge field displays the Medicare number of the client. - Client's Medicare IRN: {ClientMedicareIRN}
This merge field displays the Medicare IRN of the client. - Client's Business Name: {ClientBusinessName}
This merge field displays the business name of a third-party client profile. (Not applicable for the referrer, contact, and client profiles). - Client's Occupation: {ClientOccupation}
This merge field displays the client's occupation. - Client File Under: {ClientFileUnder}
This merge field shows the text entered in the 'File Under' field in the client profile. - Client's Default Insurance Number: {ClientInsuranceNumber}
This merge field displays the default insurance number in the client's profile. - Nominative Pronoun (e.g. he, she, or they): {he/she}
This merge field displays the client's nominative pronoun based on their gender set in the client's profile. - Pronominal Possessive Pronoun (e.g. his, her, or their): {his/her}
This merge field displays the client's possessive pronoun based on the gender set in the client's profile. - Accusative Pronoun (e.g. him, her, or them): {him/her}
This merge field displays the client's accusative pronoun based on the gender set in the client's profile. - Predicative Possessive Pronoun (e.g. his, hers, theirs): {his/hers/theirs}
This merge field displays the client's predicative possessive pronoun based on the gender set in the client's profile. - Reflexive Pronoun (e.g. himself, herself, themself): {himself/herself/themself}
This merge field displays the client's reflexive possessive pronoun based on the gender set in the client's profile.
System Merge Fields
These merge fields allow you to provide access to core system features such as the Client Portal, Telehealth, and online forms.
When Enable URL shortening for SMS links is on, links from these fields may appear as a short zanda.link address in SMS. See Use Short Links in SMS Messages.
- Client Portal: {ClientPortal}
This merge field displays the link to your Client Portal. Clients can click on it to book an appointment with you. - Client Portal Registration Link: {PortalRegistrationLink}
This merge field generates a link for existing clients in your Zanda account to register or reset their client portal login details. - ClientTelehealthUrl: {ClientTelehealthUrl}
This merge field displays the unique Zoom Telehealth link located in the client's profile. Using this link, your client can join the Zanda Telehealth session that they've booked with you (see: Managing Zoom Telehealth Pro Sessions). - Online Form: {OnlineForm:####} (#### is Form Template Id)
This merge field generates your desired form in your client's profile and automatically displays the link in your template enabling you to quickly send the form to your client. - Incomplete Form (Automation Use Only): {IncompleteForm} - automatically inserts the direct link to a client’s outstanding form(s), but only when used inside an Incomplete Forms Automation.
• It pulls in the exact form links that match the automation’s conditions (e.g., template selected, form not completed, timing rules).
• It allows clients to open their pending form directly from the SMS or email they receive.
• It will not populate in any other type of automation or message, including manual emails or non–form-related automations.If you preview a message and see the merge field appear blank, this is expected — the field only fills at the moment the Incomplete Forms Automation runs and only when there is a valid incomplete form for that client.
Client's Preferred Practitioner Merge Fields
The client's preferred practitioner is set in Admin → Manage in the client's profile. The below merge fields allow you to display that practitioner's calendar information located in User Menu > Account Settings > Team > Practitioners.
- Client's Preferred Practitioner Short Name: {ClientPreferredPractitionerShortName}
Displays the preferred practitioner's short name. - Client's Preferred Practitioner Name: {ClientPreferredPractitionerRealName}
Displays the preferred practitioner's real name - Client's Preferred Practitioner Full Name: {ClientPreferredPractitionerFullName}
Displays the preferred practitioner's first and last name. - Client's Preferred Practitioner Email: {ClientPrimaryPractitionerEmail}
Displays the preferred practitioner's email address. - Client's Preferred Practitioner Mobile Phone: {ClientPreferredPractitionerMobilePhone}
Displays the preferred practitioner's mobile number. - Client's Primary Practitioner Job Title: {ClientPrimaryPractitionerJobTitle}
Displays the preferred practitioner's job title.
Referrer Merge Fields
The referrer profile which you've selected as the default in the client's profile, that profile's details will appear via these merge fields. They will also work when you generate the communication template in the referrer's profile.
Note:
When creating a template for the Bulk Send feature to contact referrers, use {Recipient...} type of merge fields instead of {Referrer...} type merge fields.
- Referral Start Date: {ReferralStartDate}
Displays the start date of the referral period with the client. - Referral End Date: {ReferralEndDate}
Displays the end date of the referral period. - Referral Notes: {ReferralNotes}
Displays the notes added under the referral entry in the client's profile. - Referrer Salutation: {ReferrerSalutation}
Displays the referrer's salutation. - Referrer Name: {ReferrerName}
Displays the referrer's name. - Referrer First Name: {ReferrerFirstName}
Displays the referrer's first name. - Referrer Last Name: {ReferrerLastName}
Displays the referrer's last name. - Referrer Company: {ReferrerBusinessName}
Displays the referrer's business name. - Referrer ID (Provider Number): {ReferrerProviderNumber}
Displays the referrer's provider number. - Referrer Fax: {ReferrerFax}
Displays the referrer's fax number. - Referrer Email: {ReferrerEmail}
Displays the referrer's email address. - Referrer Phone: {ReferrerPhone}
Displays the referrer's phone number. - Referrer Address: {ReferrerAddress}
Displays the referrer's physical address. - Referrer Postcode: {ReferrerPostcode}
Displays the referrer's postcode. - Referrer State: {ReferrerState}
Display the state where the referrer is located. - Referrer Suburb/Town: {ReferrerSuburb}
Display the suburb/town where the referrer is located.
Next, Previous, Last, All Appointment Merge Fields
The previous and next appointment merge fields display information related to a client's previous appointment or the next appointment which is scheduled to take place.
How the next appointment is chosen: The Next Appointment fields always show the client's soonest upcoming appointment—the earliest appointment scheduled after the moment the message is sent. This is worked out from the current date and time, not from the appointment the template is attached to. Because of this, if you send a manual email while the appointment you are sending from is also the client's soonest upcoming appointment, the Next Appointment fields (like {NextAppointmentDate}) and the appointment-specific fields (like {AppointmentDate}) will show the same details—that one appointment is both the appointment you selected and the client's next appointment on the calendar.
There is no merge field for the appointment after this one. If a client has a second appointment booked further out, it will only start appearing in the Next Appointment fields once the earlier appointment has passed. To list every upcoming appointment in one message instead, use {ListAllFutureAppointments}.
- Last Appointment Start Date and Time: {LastAppointmentStartDateTime}
Displays the start and end time of the client's last appointment. -
Last Appointment Date : {LastAppointmentDate}Displays the date of the client's last appointment.
- List All Past Appointments: (Email/Letter Only) {ListAllPastAppointments}
Generates a table of the client's past appointments. Zanda builds the table for you with a fixed set of columns: Date, Time, Status, Location, and With (the practitioner). - List All Future Appointments: (Email/Letter Only) {ListAllFutureAppointments}
Generates a table of the client's active future appointments. Zanda builds the table for you with a fixed set of columns: Date, Time, Location, and With (the practitioner). Cancelled, late-cancelled, and rescheduled appointments are left out, and the table does not include .ics calendar files for the individual appointments in it. - Next Appointment Start Date and Time: {NextAppointmentStartDateTime}
Displays the start date and time of the next appointment scheduled with the client. -
Next Appointment Date : {NextAppointmentDate}Displays the date of the next appointment scheduled with the client.
- Next Appointment End Date and Time: {NextAppointmentEndDateTime}
Displays the end date and time of the next appointment scheduled with the client. - Next Appointment Location Name: {NextAppointmentLocationName}
Displays the location name of the next appointment scheduled with the client. - Next Appointment Location Address: {NextAppointmentLocationAddress}
Displays the location name of the next appointment scheduled with the client. - Next Appointment Location Suburb: {NextAppointmentLocationSuburb}
Displays the location of the next appointment scheduled with the client. -
Appointment Location State : {AppointmentLocationState}The State of the Location as specified within the Location settings.
- Next Appointment Location Phone: {NextAppointmentLocationPhone}.
Displays the phone number of the next appointment's location. - Next Appointment Practitioner Short Name: {NextAppointmentPractitionerName}
Displays the practitioner's short name with whom the client has their next appointment. - Next Appointment Practitioner Mobile Phone: {NextAppointmentPractitionerMobilePhone}
Displays the mobile number of the practitioner with whom the client has their next appointment. -
Next Appointment Practitioner Email : {NextAppointmentPractitionerEmail}Displays the email address of the practitioner with whom the client has their next appointment.
- Next Appointment Practitioner Full Name: {NextAppointmentPractitionerFullName}|
Displays the full name of the practitioner with whom the client has their next appointment. - Next Appointment Practitioner Job Title: {NextAppointmentPractitionerJobTitle}
Displays the job title of the practitioner with whom the client has their next appointment.
Frequently Asked Questions
❓ Can I add the appointment end time, or any other column, to the generated appointment tables?
The columns in both tables are set for you, and the Time column shows the appointment start time. To show a client an end time, use one of these fields instead:
- {AppointmentEndTime} in a template that is sent from a selected appointment, such as an appointment reminder or a manual email sent from the appointment. It shows the end time of that one appointment.
- {NextAppointmentEndDateTime} in any template, including automated and bulk messages. It shows the end date and time of the client's soonest upcoming appointment, and displays "No appointment booked" if the client has none.
Those fields each cover one appointment. If end times for every appointment in the generated table would help your practice, you can submit the request through the Customer Ideas Portal.
User Merge Fields
This merge field will merge information specific to the user that is logged in when sending the communication.
- User Signature (Email/Letter Only): {UserSignature}
If the user that is logged in has a signature uploaded in their profile and creates an email or letter that contains this merge field, their signature image will automatically replace the merge field. if the user has no signature image uploaded then the merge field will be blank. This only works for manually created email or letters, not any automatic communications such as reminders, or for SMS templates.
Links to Online Forms
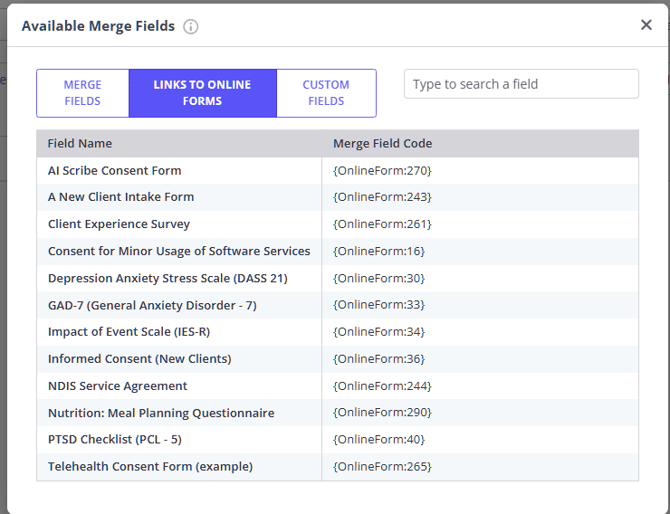
When you create new online forms, or copy them from the Zanda templates library, each such form will automatically have its own message merge field. To save you from going back to Tools > Form Designer and opening each form to copy their Message Merge Field, you can now select the Links to Online Forms button and copy the merge field of the form you need to include in your communication template
Links to Custom Profile Fields (Custom Fields)
Custom Profile Fields can also be used as dynamic merge fields in your email, SMS, and letter templates. This allows you to automatically insert practice-specific information stored in a client, contact, referrer, third-party, or shared profile — without manually typing it each time.
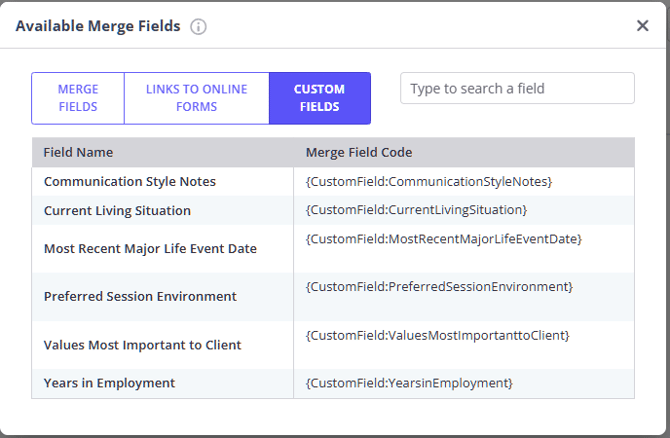
Custom Profile Field merge fields are especially helpful when you need to reference:
-
Funding types or program details
-
Insurance or membership numbers
-
Risk flags or internal classifications
-
Important identifiers or key dates
-
Any other structured data your practice tracks
Because these fields are fully configurable in your account, the available merge fields will match the Custom Profile Fields you’ve created in User Menu > Account Settings > Clients > Custom Profile Fields.
Learn more about custom profile fields and how they are used in Zanda here.