In this article:
- Key Features of Zoom Telehealth Pro
- Zoom Telehealth Pro Subscription Fees
- How to Enable Zoom Telehealth Pro in Your Zanda Account
- Running Telehealth Pro Sessions
- Related Articles
Key Features of Zoom Telehealth Pro
Important Note: When you run Zoom Telehealth sessions with Zanda Telehealth Pro, they are covered under Zanda Zoom licence.
You do not need to purchase or maintain a separate personal or organisational Zoom licence specifically for telehealth calls conducted via Zanda Telehealth Pro.
All available Zoom features and required compliance for these sessions are included as part of the Zanda platform.
With Zoom Telehealth Pro, you will have access to the following advanced features integrated into your Zanda system:
- Maximum Call Length: 3 hours.
- Number of telehealth sessions per month: Unlimited number of 3-hour sessions.
- Group Sessions: Host telehealth group sessions with up to 20 participants, plus the host.
- Computer Audio Sharing: Share audio from media files (e.g., YouTube videos) directly within Zoom.
- Screen Sharing: Easily share your screen during sessions.
- Virtual Backgrounds: Zoom enables you to upload your custom virtual backgrounds for a more professional environment.
- Whiteboards: Collaborate with clients using virtual whiteboards.
- Closed Captions: both practitioners and clients can enable in app and in browser.
- File Sharing: Send and receive files during the session.
- In-App Chat: Engage with clients during the session for smooth communication.
-
Session Recordings: You have the ability to record your sessions and save the recordings directly to your computer.
-
To record your sessions, use the Zoom Desktop App, which allows for secure local storage and easy access for future reference.
⚠️ Important: Session recordings are only available through the desktop app; the browser version does not support this recording feature.
-
Please note that saving recordings to cloud storage is not permitted.
- Zoom Flexibility: Use either the Zoom Desktop App or your browser to run Zoom sessions. On most devices, users are not required to download Zoom for this service to function properly. If practitioners wish to start their sessions on their iPhone, they will be required to use the Zoom App, this is enforced by Zoom.
- ⚠️ Waiting room customisation is not available with Zoom Telehealth Basic and Pro. Because these sessions run under Zanda shared Zoom account, practitioners do not have access to the Zoom account-level settings where waiting room personalisation (such as adding a video, logo, or custom message) is managed. If waiting room customisation is a requirement, consider using Zoom BYO Telehealth, which allows you to connect your own Zoom account and apply your own account settings.
Zoom Telehealth Pro Subscription Fees
Zoom Telehealth Pro subscriptions are available per practitioner/per month.
Here are the monthly fees per a practitioner in a local currency:
- US: $9
- UK: £7
- EU: €9
- NZ: $9 NZD
- AU: $9 AUD + GST
- CA: $9 CAD
- ZA: R160
- All other areas: $9 USD
Frequently Asked Questions:
❓ How will the billing work if I enable or cancel Telehealth Pro in the middle of the monthly subscription period?
- When you enable your Telehealth Pro subscription, you will be billed on a pro-rata basis for the remainder of the first month. For subsequent months, you will be charged the full monthly subscription fee.
- If you choose to cancel your Telehealth Pro subscription mid-month, you are able to do this via User Menu > Account Settings > Communication > Telehealth. Once cancelled, you will still be able to use the Telehealth Pro calls until the end of the paid period, and you will be billed for the entire month. The Telehealth Pro settings form will show you the date when the paid period lapses.
❓ Where can I find more information about Zanda Telehealth Basic vs. Pro plans?
- You can find a detailed comparison of Zanda Telehealth Basic and Pro plans here: Zoom Telehealth Basic vs. Pro
How to Enable Zoom Telehealth Pro in Your Zanda Account
Zoom Telehealth Pro subscriptions are available for individual practitioners.
- When a practitioner starts a Zoom Telehealth Basic call, they will see an option to upgrade to a Telehealth Pro subscription and start using it immediately.

- A Zanda account Master User or an authorized user with permission to Setup and Configure Zanda can also enable Telehealth Pro for individual practitioners.
1. Go to User Menu > Account Settings > Communication > Telehealth.
2. Click the 'Configure Telehealth Pro' button.
3. You will see a list of all active practitioners in your account. Select practitioner profiles where Telehealth Pro will be enabled.
- To do so, just check the box in front of their practitioner name.
- If all practitioners need to have Telehealth Pro enabled, you will be able to select all practitioners in the list by checking the check box at the top-left of the table.
4. When practitioners are selected, click the 'Enable Pro For Selected' button.
5. Click 'Yes, Enable' and close the modal.
Note: After you disabled Telehealth Pro subscription for a practitioner, it will be active for them until the end of your paid subscription cycle. The date until Pro is active will be shown in the table, as seen in this screenshot.
Running Telehealth Pro Sessions
Note
- The name displayed for you as a participant in a Zoom Telehealth session will be taken from the settings of your practitioner profile within your Zanda account.
- You can rename your participant during the session by clicking the Participants button, then selecting More next to their name. Keep in mind that any changes made will not carry over to your next session. To ensure the participant's name is displayed permanently as desired, please update the settings in your practitioner profile.
- You can configure a default image for your participant when their video is turned off, as well as select a virtual background for your own video if you join the session through the Zoom App. These preferences will be retained for your future sessions.
Each client appointment and group appointment will have the option to enable and start a Zoom Telehealth Pro session.
- Click the appointment block on the calendar.
- The appointment panel will open on the right side.
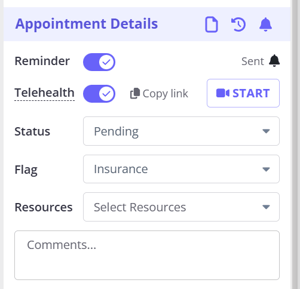
- The Appointment Details section included the controls to manage Zoom Telehealth sessions:
- Turn on the switch to enable the Zoom Telehealth on this appointment;
- Copy link to send it to the client when necessary;
- Click 'Start' to start the session.
4. Alternatively, click the telehealth video icon on the hover card to start the session.
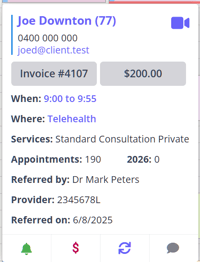
If you don't have the Edit Appointment permission and aren't able to open the appointment panel, you only need to hover over the appointment block on the calendar to see the appointment hover card.
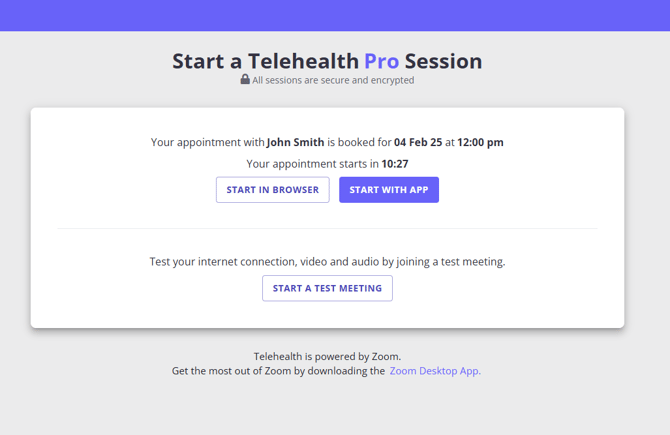
5. The Telehealth Pro launch page will open. Here you will be able to start a test meeting or start a live session.
- If you start a session on a desktop or laptop computer, you will be able to start it via a browser, or via Zoom Desktop App.
- ❗If you wish to start a session on your mobile device, you will only have an option to use the Zoom Mobile App. This is a limitation enforced by Zoom.
6. Click the 'Start in Browser' or 'Start With App' button on a desktop/laptop computer, or 'Start In App' on a mobile device:
7. You can test your speaker and microphone before joining the session

8. When a client joins the session, they will be placed in the waiting room. You will hear the bell sound notification when any client wants to join the call.
💡 Please keep the participants list open to see who is in the waiting room while waiting for clients to join.
9. When in a session, use the controls at the bottom of the screen to manage the session*
*Note:
- You will be able to record a session, saving the recording on your computer. Saving to a cloud will not be permitted.
- The use of Zoom AI Companion will not be available.
10. To end the session, click 'End' at the top-right and select 'End Meeting For All'
Related Articles:
- Enabling Telehealth Calls on Appointments Automatically
- Inviting Clients to a Zoom Telehealth Session
- Adding Telehealth Services and Item Numbers
- Managing Zoom Telehealth Basic Sessions
- Zoom Telehealth Basic vs Pro
- Managing Zoom BYO Telehealth Sessions
- Joining a Telehealth Session as a Client
- Flagging Telehealth Appointments
- Using Zoom Telehealth - FAQ
- Getting Ready for a Zoom Telehealth Session
- Zoom Telehealth Useful Tips